Build a geodesic dome
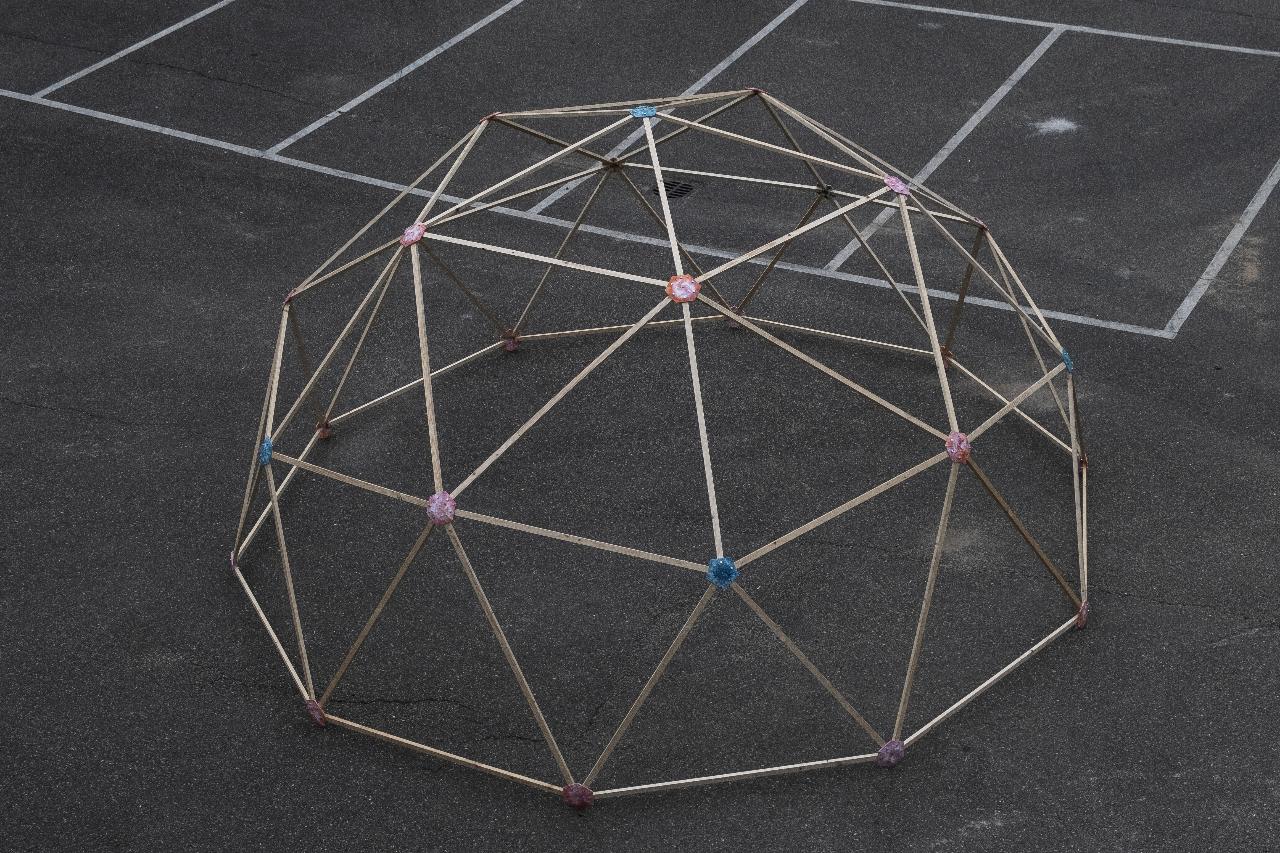
The Geodesic Dome is a lightweight structure using a minimum of materials. It is constructed by triangular elements, which are structurally rigid and splitting the stress evenly. Usually, it is used for greenhouses or temporary structures.
Step 1-6: Prepare your components (1-2 days)
Step 7-11: Assemble the structure (1-2 hours)
—
Attachments
Resources
3D Files
Step 1 - Design your structure
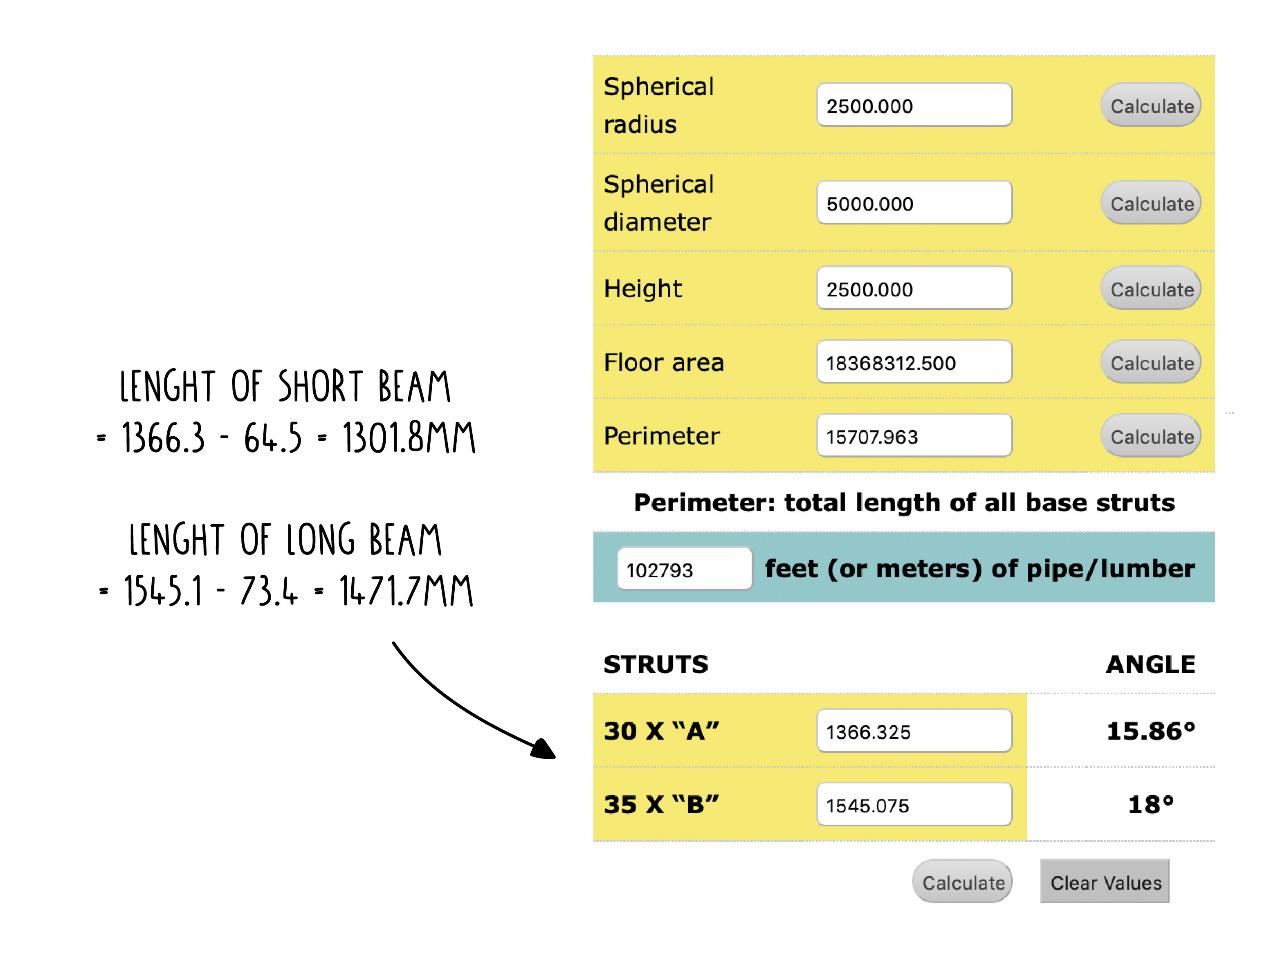
First of all, decide how big your dome should be and calculate the required sizes of the elements. Consider that the diameter of the structure equals double of its height.
There are several tools on the internet to help calculating the size of each individual beam. This is the one we used:
http://www.domerama.com/calculators/2v-geodesic-dome-calculator/
You can put in your dome size and it will calculate the required beam lengths for you.
In any case, we have to shorten the lengths a bit so that they work with our joints.
Short beams: - 64.5mm
Long beams: - 73.4mm
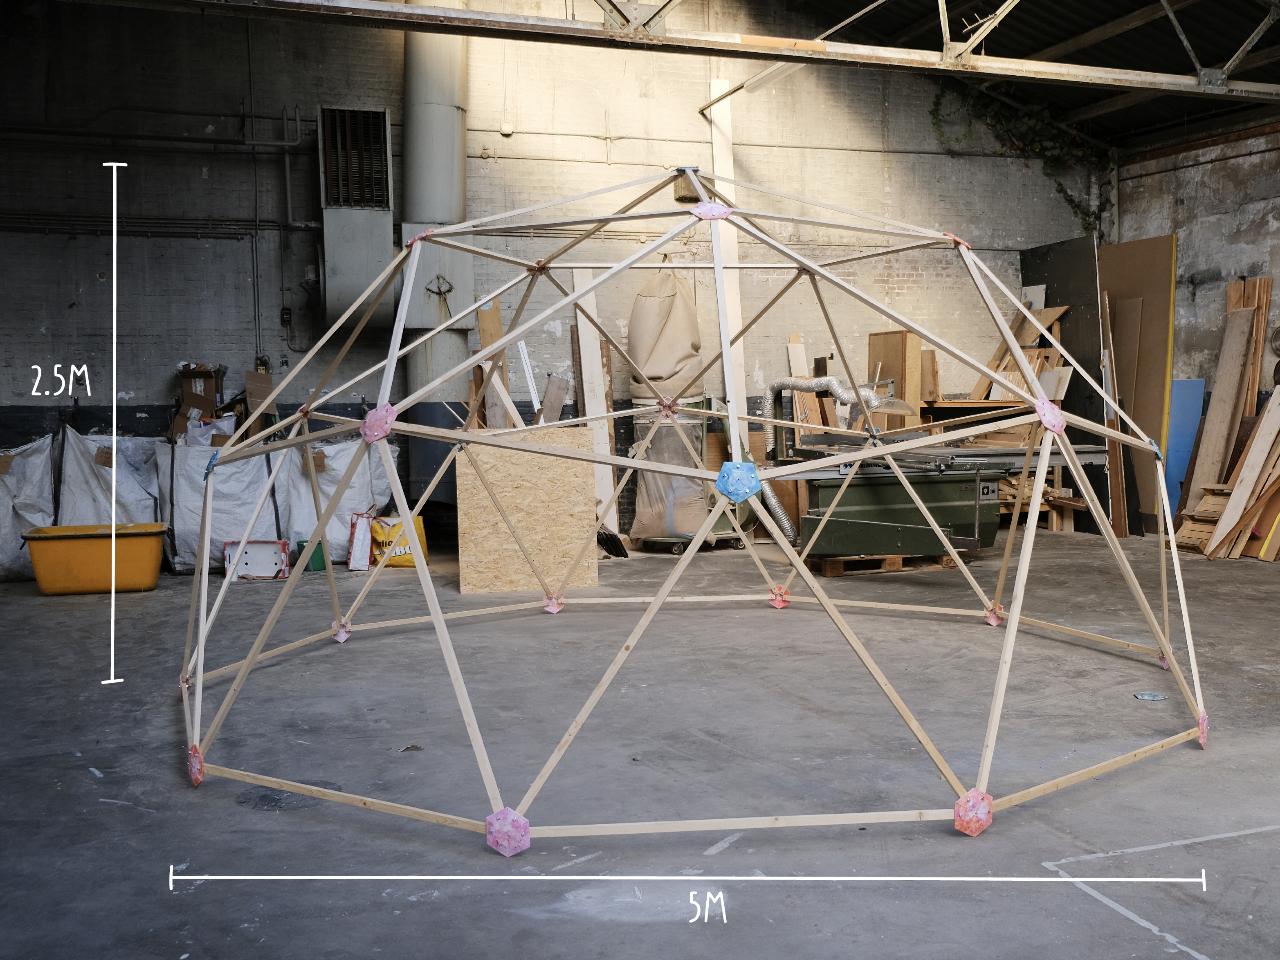
In this example, we are making a 2.5m high dome (5m diameter).
There are several tools on the internet to help calculating the size of each individual beam. This is the one we used:
http://www.domerama.com/calculators/2v-geodesic-dome-calculator/
You can put in your dome size and it will calculate the required beam lengths for you.
In any case, we have to shorten the lengths a bit so that they work with our joints.
Short beams: - 64.5mm
Long beams: - 73.4mm
In this example, we are making a 2.5m high dome (5m diameter).
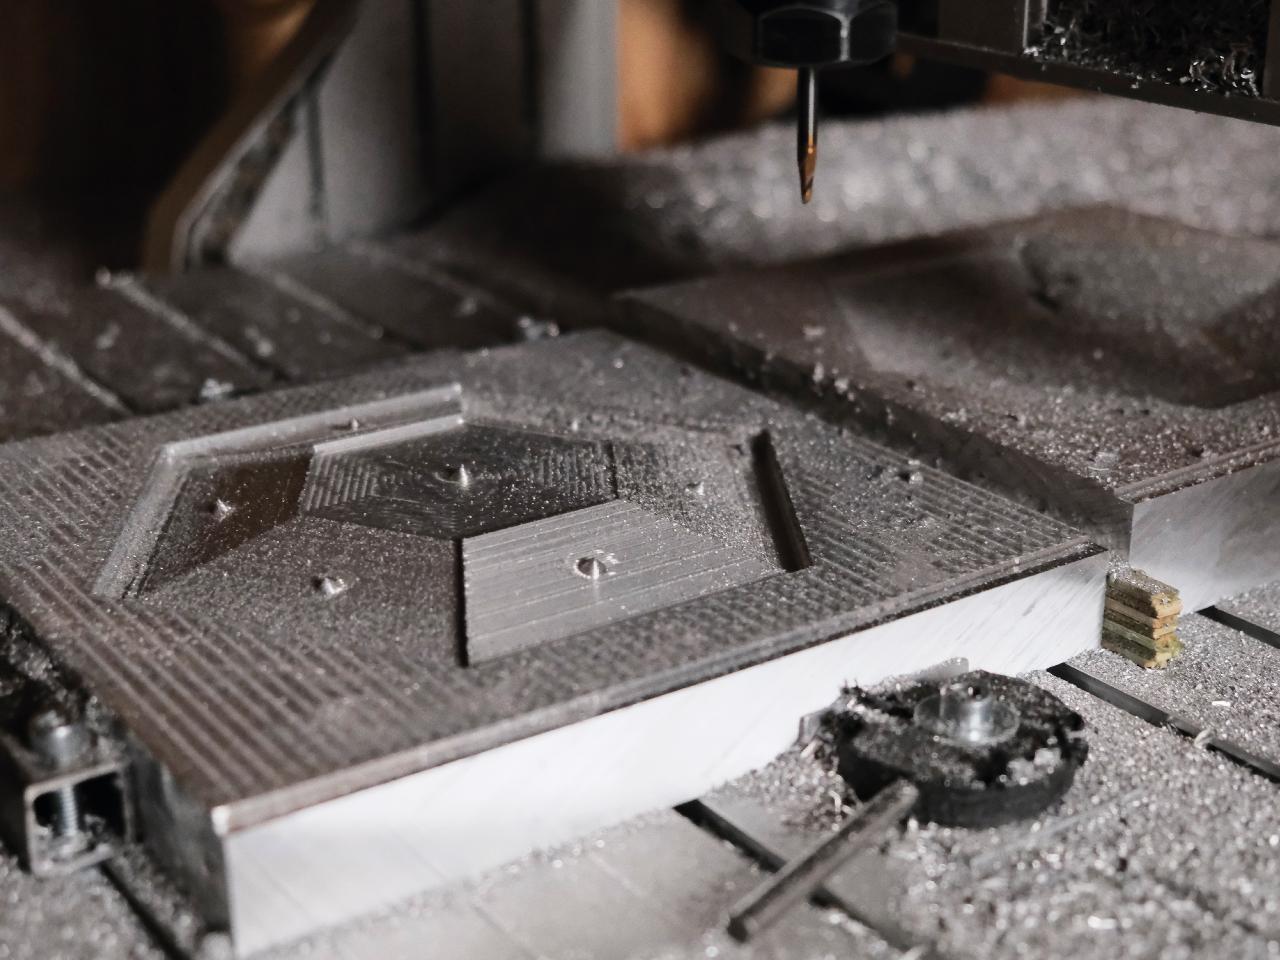
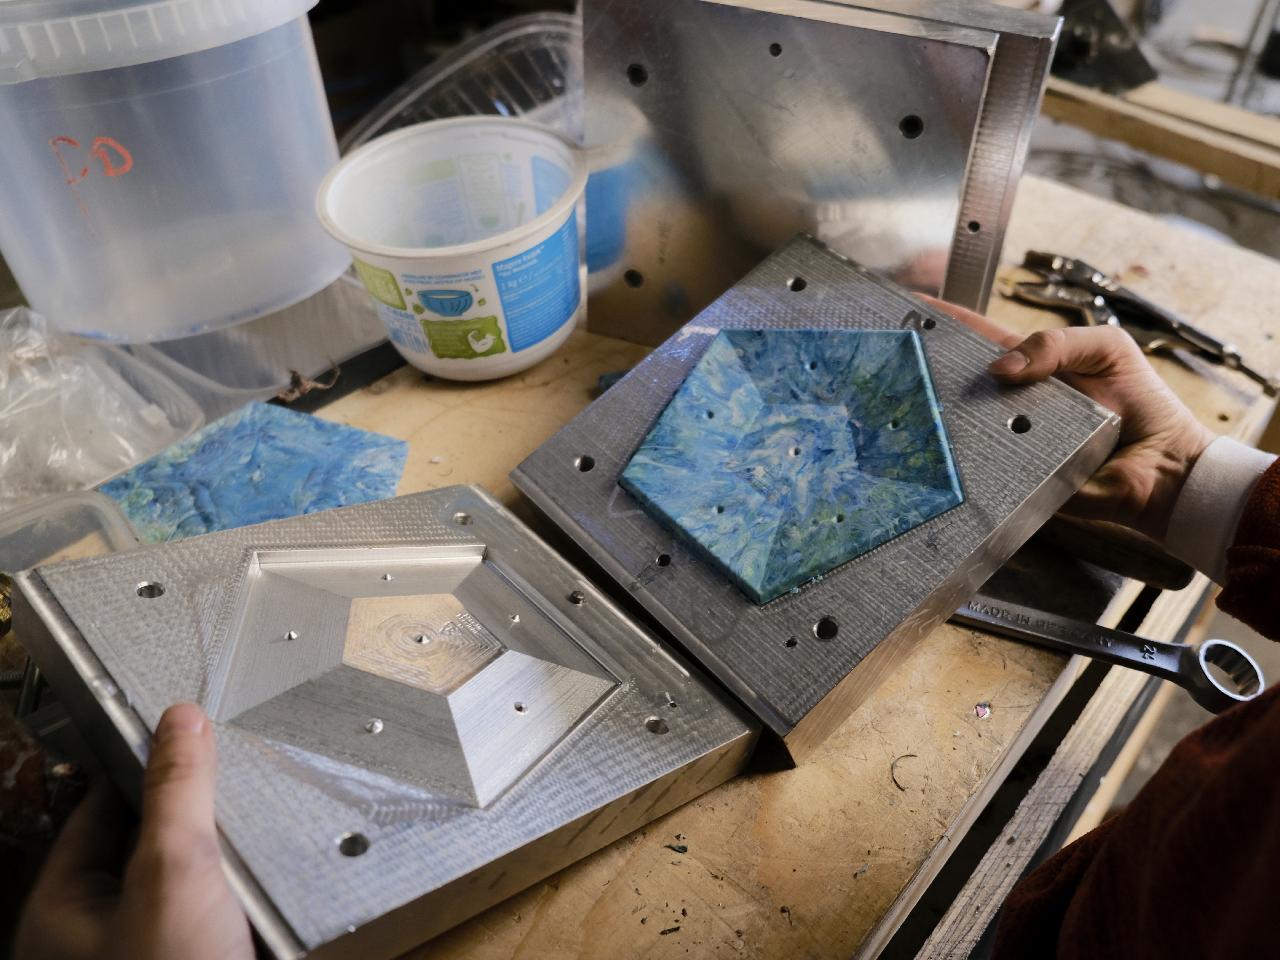
Step 2 - Make the moulds for your joints
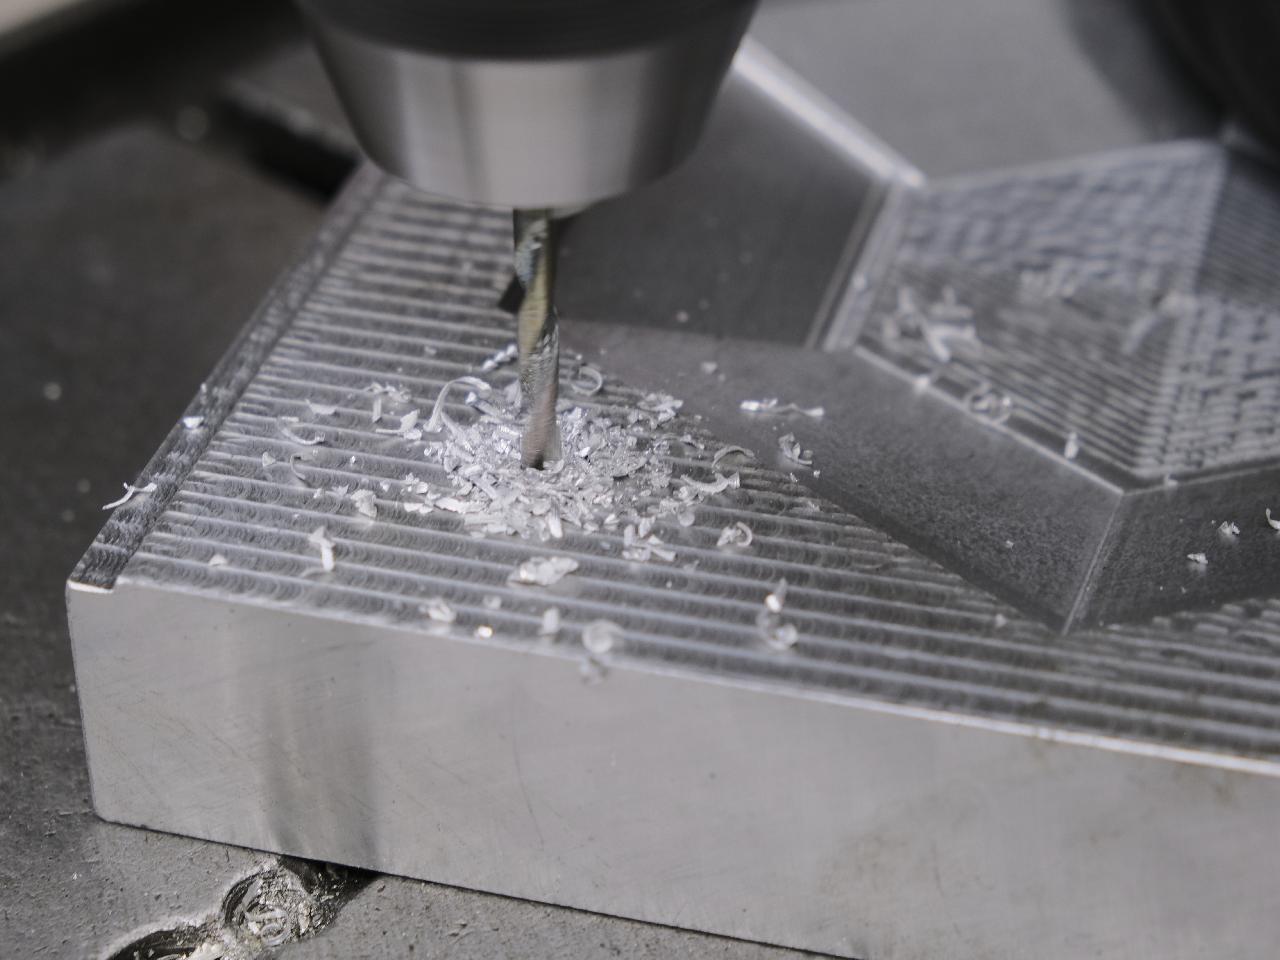
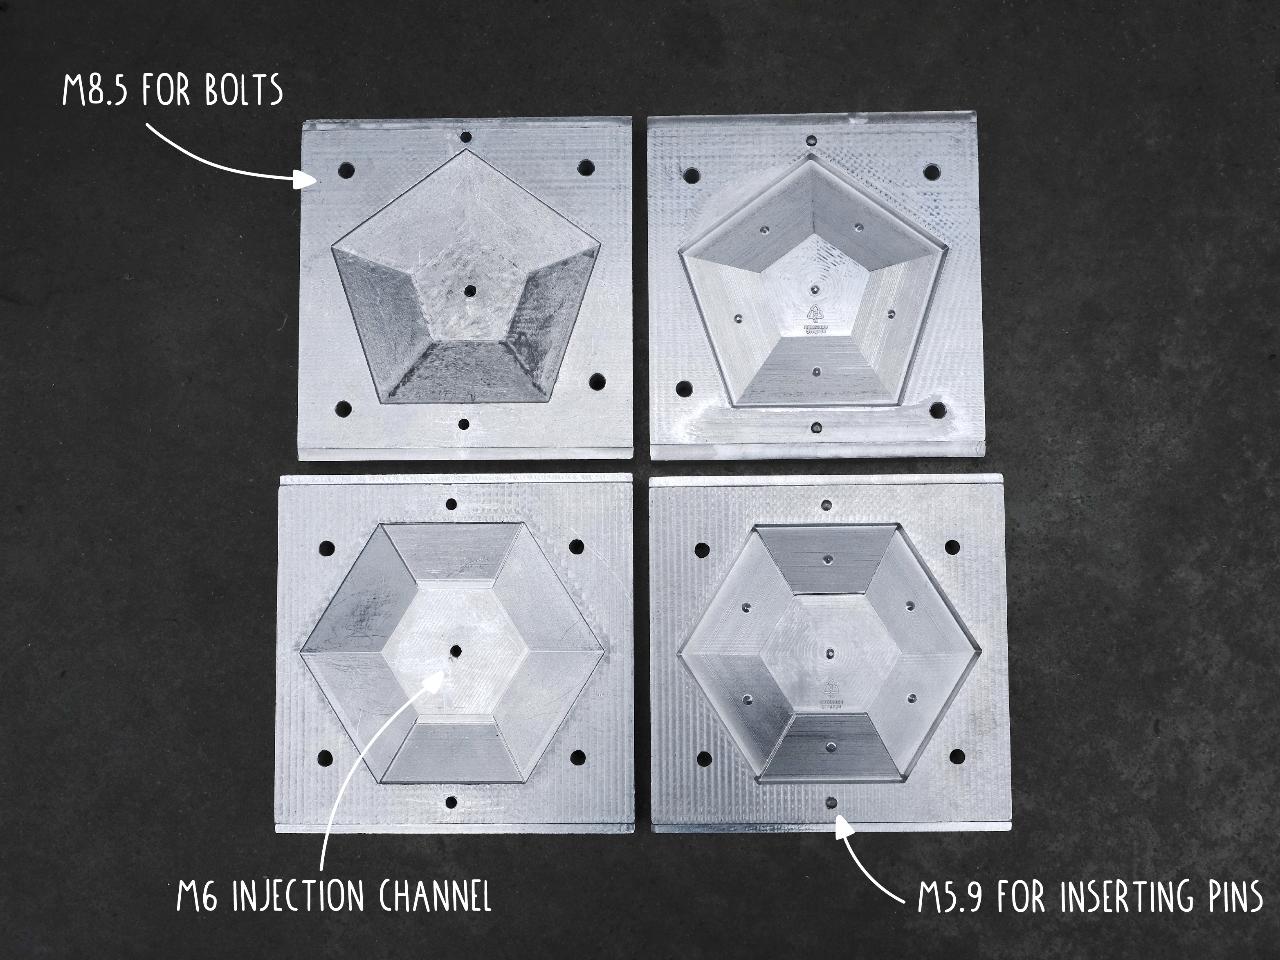
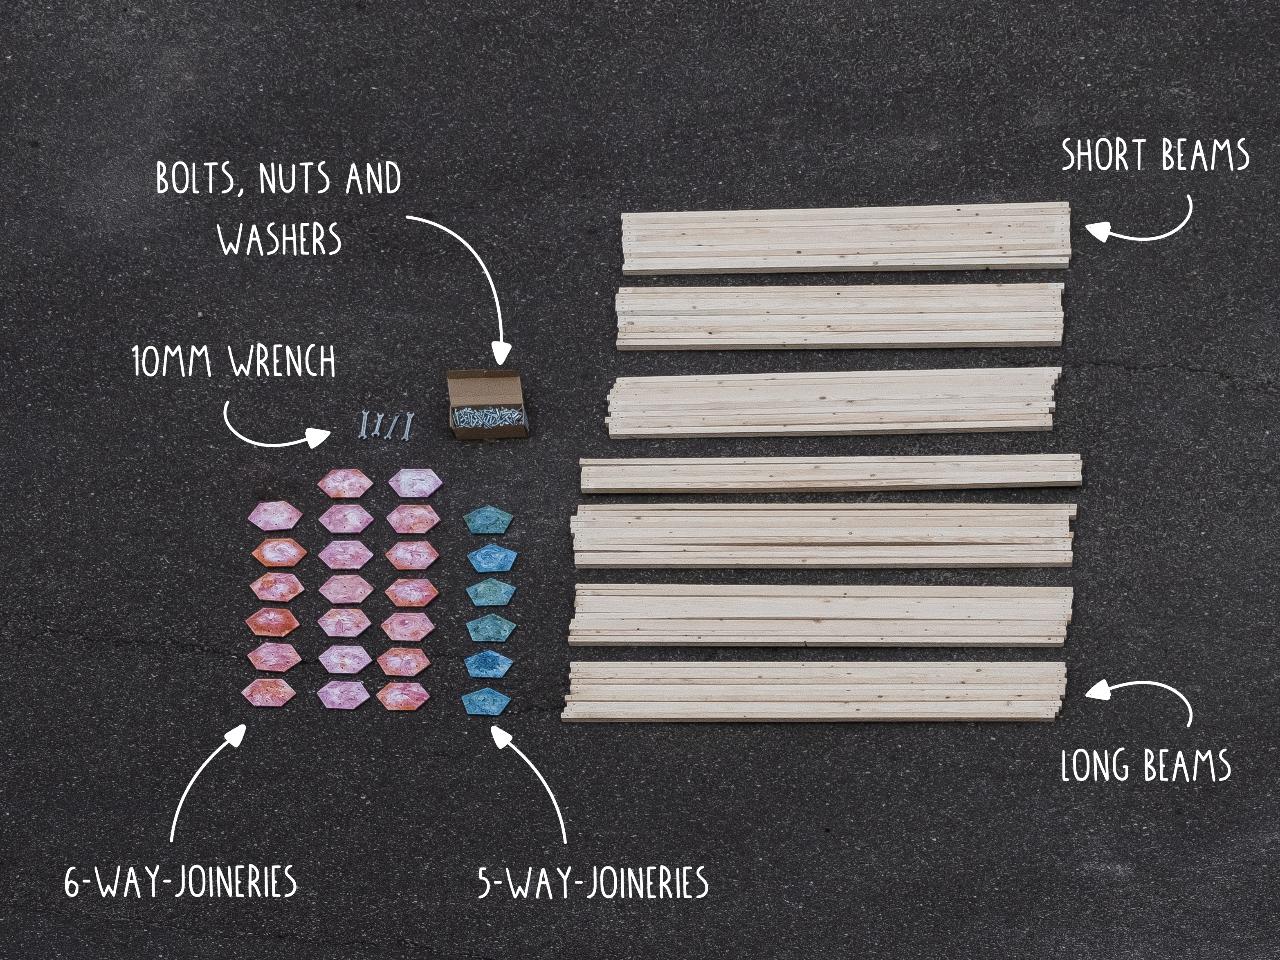
To build a geodesic dome, we will need 6 pieces of 5-way joints and 20 pieces of 6-way joints. Those pieces will be injected, so we first have to make the required moulds for the injection machine. Take the 3D model from the download kit and cnc-mill it yourself or send it to a specialist to mill it for you.
Then drill the holes for the injection point and for the bolts to close the mould.
👉 https://community.preciousplastic.com/academy/create/injection-moulds
Then drill the holes for the injection point and for the bolts to close the mould.
👉 https://community.preciousplastic.com/academy/create/injection-moulds
Step 3 - Prepare your plastic
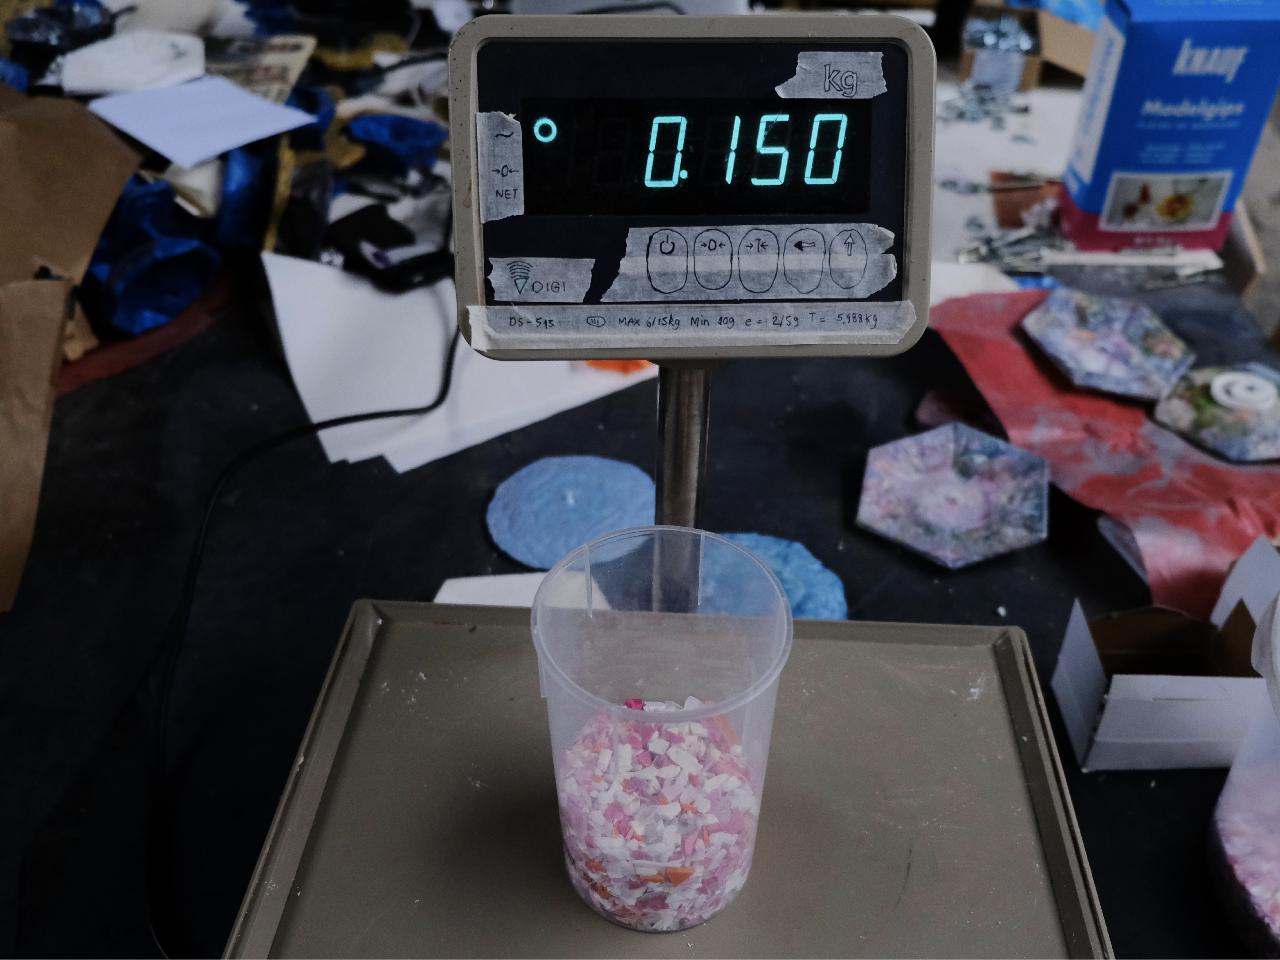
Make sure you have your material ready before starting to inject. For the joints, both HDPE and PP work for the dome due to their flexibility and strength. However, PP is recommended as it is easier to inject. PS and PET are not recommended as they are brittle. Consider that the weight of one joint is about 130g, so you will need a bit more than 3.5kg for all pieces. Use around 150g PP each time to prevent lack of pressure and loss from leak out.
Tip: Try to use finely shredded plastic to reach the injection machine’s full capacity.
Tip: Try to use finely shredded plastic to reach the injection machine’s full capacity.
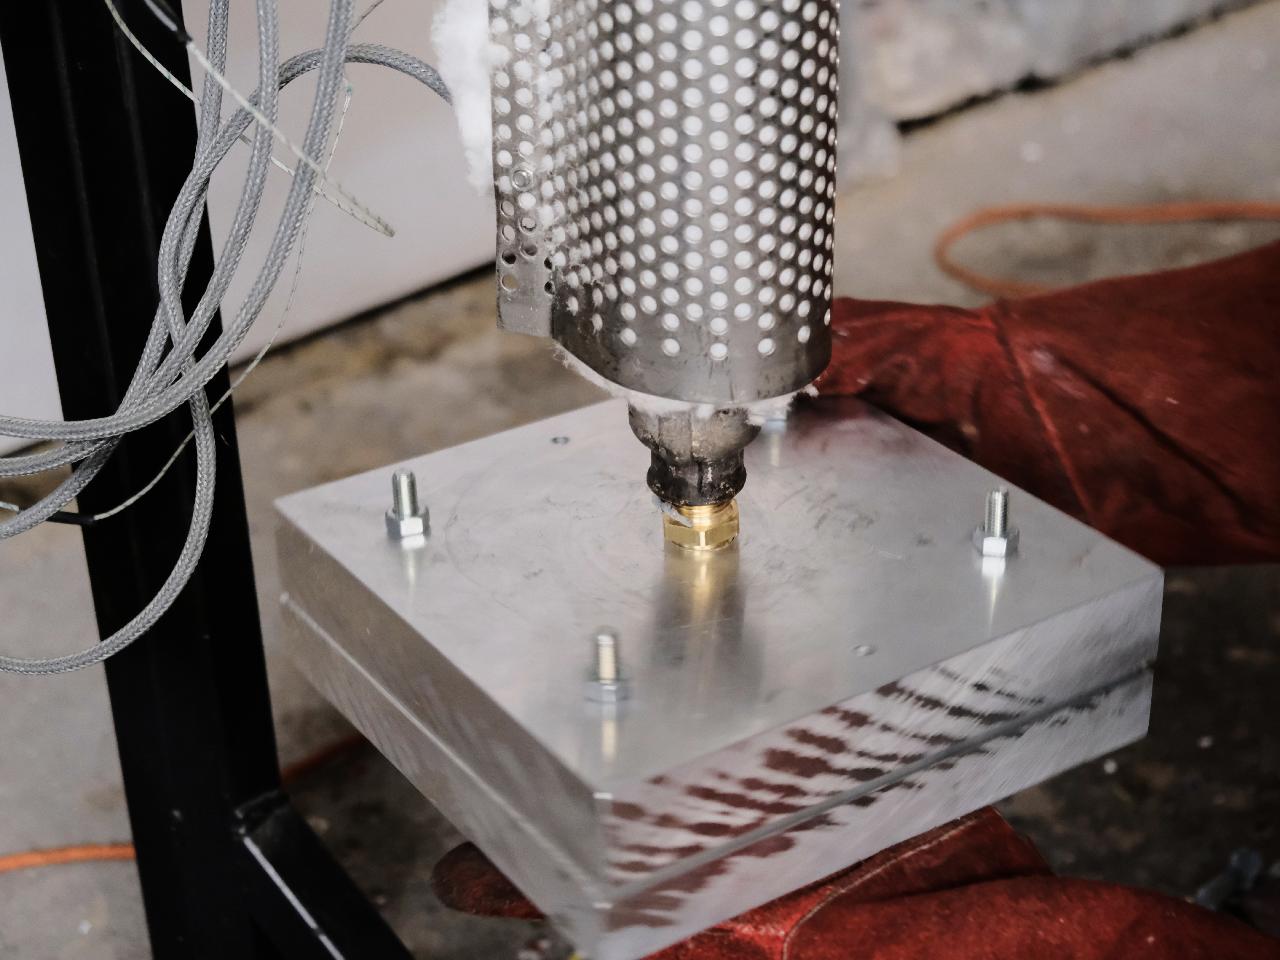
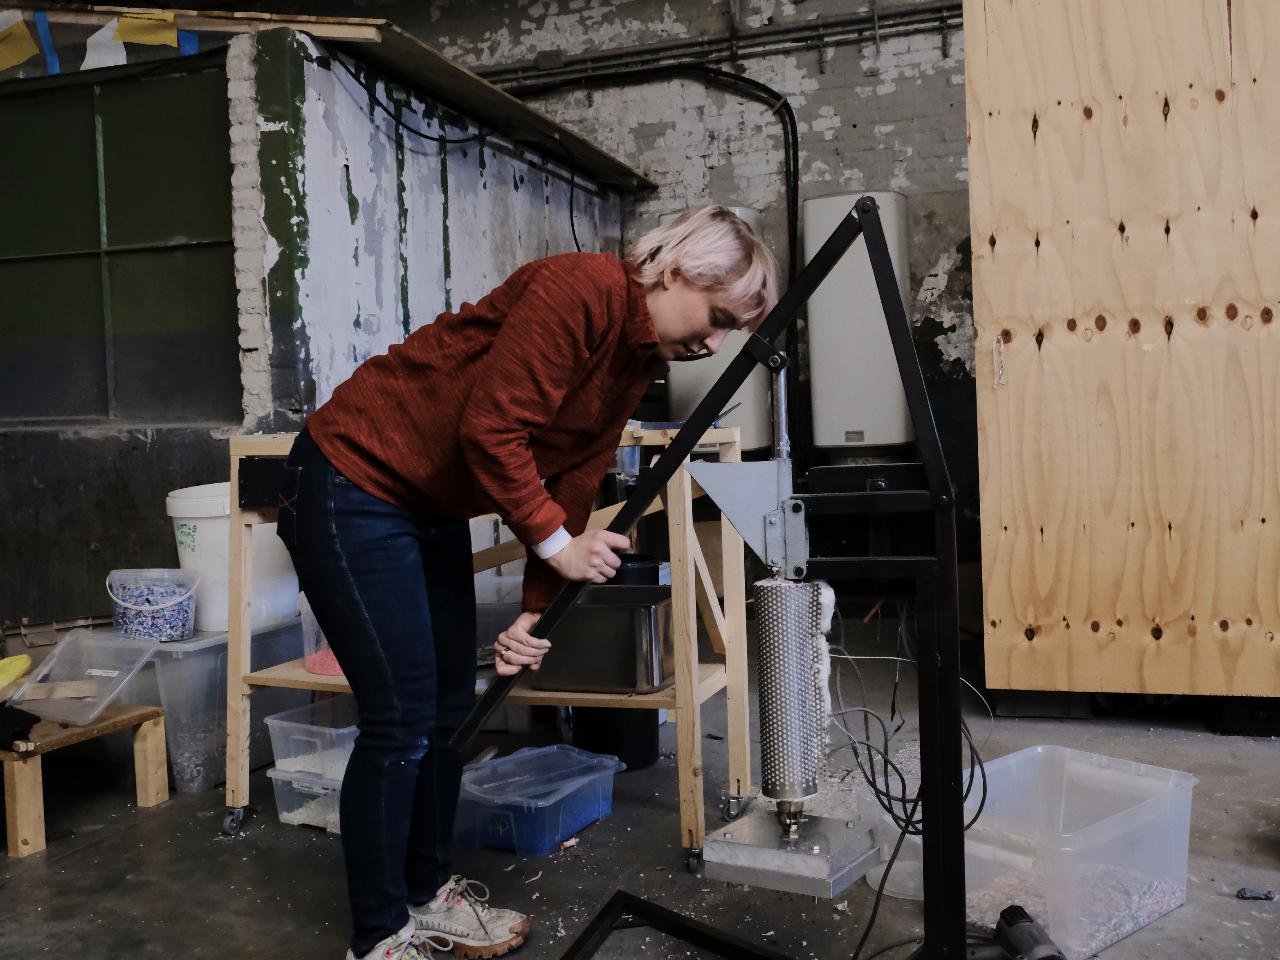
Step 4 - Inject the joints
Ready to inject! Set the temperature of the tube to 240°C and the nozzle to 230°C. The following workflow will take 12-15 mins per piece:
1 - Insert plastic to the hopper
2 - Heat up the plastic (8-9 min)
3 - Attach the mould
4 - Inject plastic
5 - Take the mould out of the machine
Repeat this process for each joint. Ongoing, while you're waiting for one mould to cool down, you can prepare the other mould for the next injection process.
If needed, here are some tips for injecting:
👉 https://community.preciousplastic.com/how-to/work-with-the-injection-machine
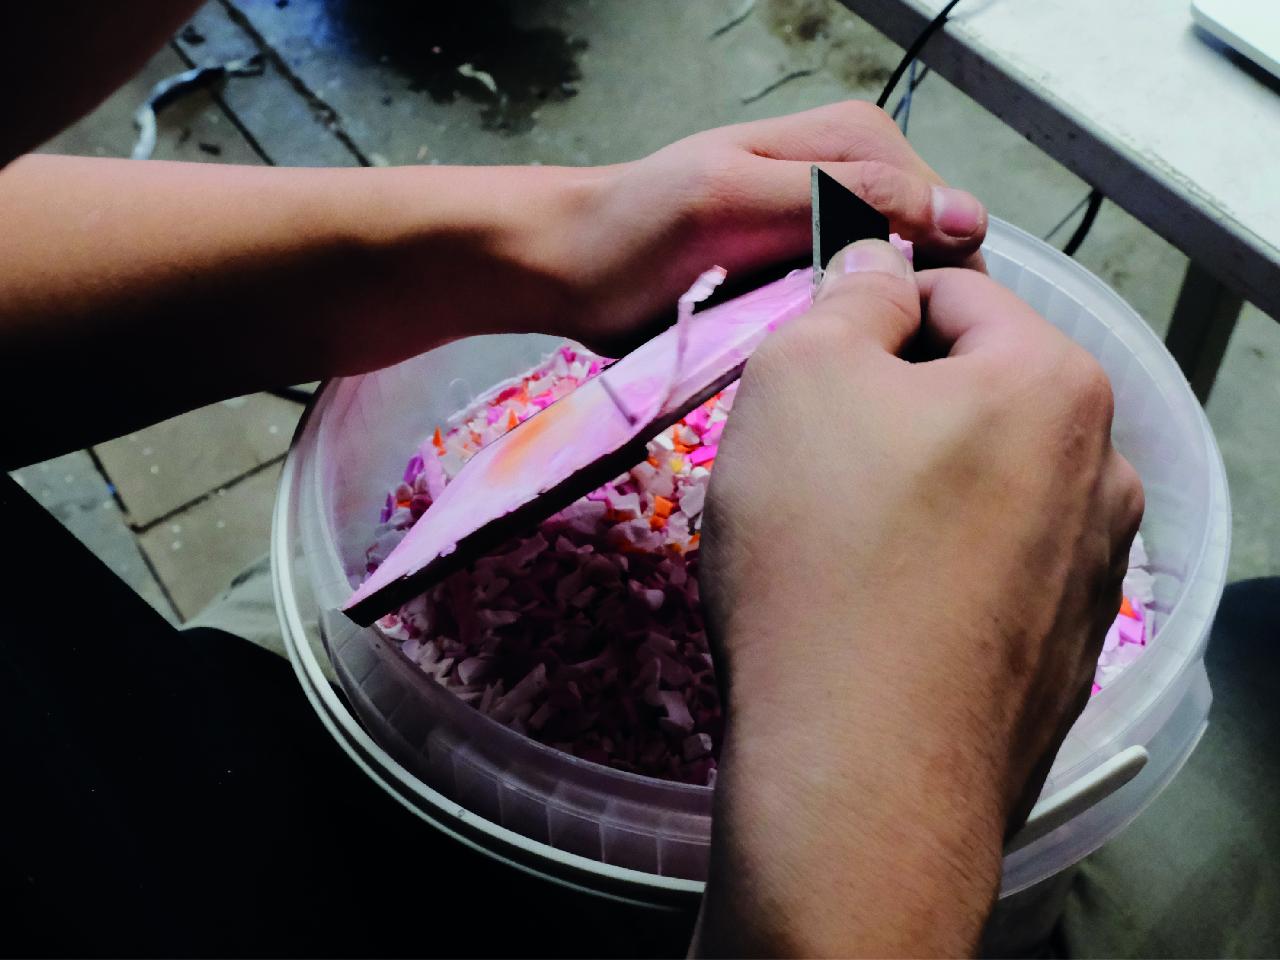
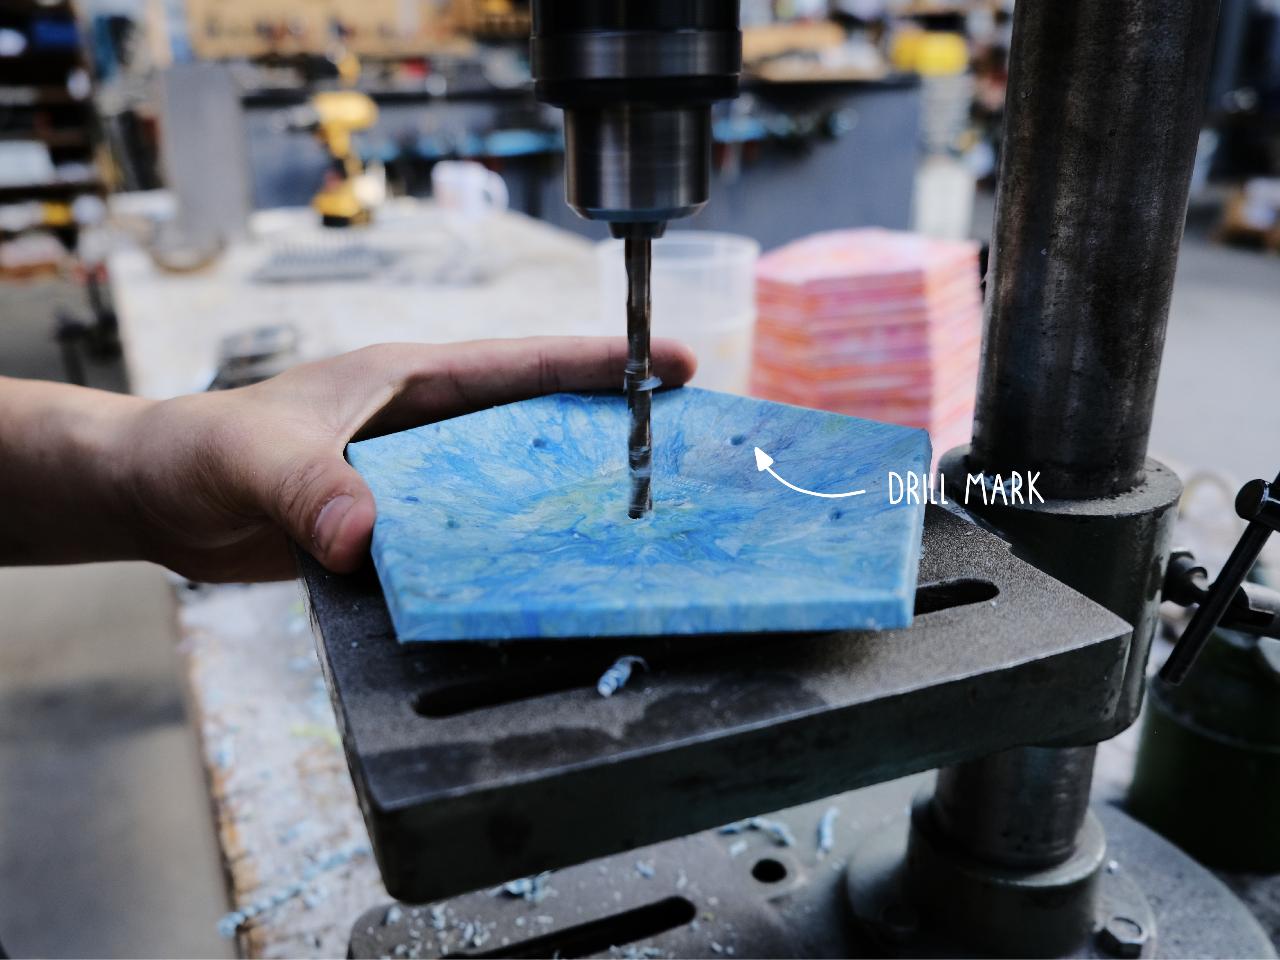
Step 5 - Finish your joints
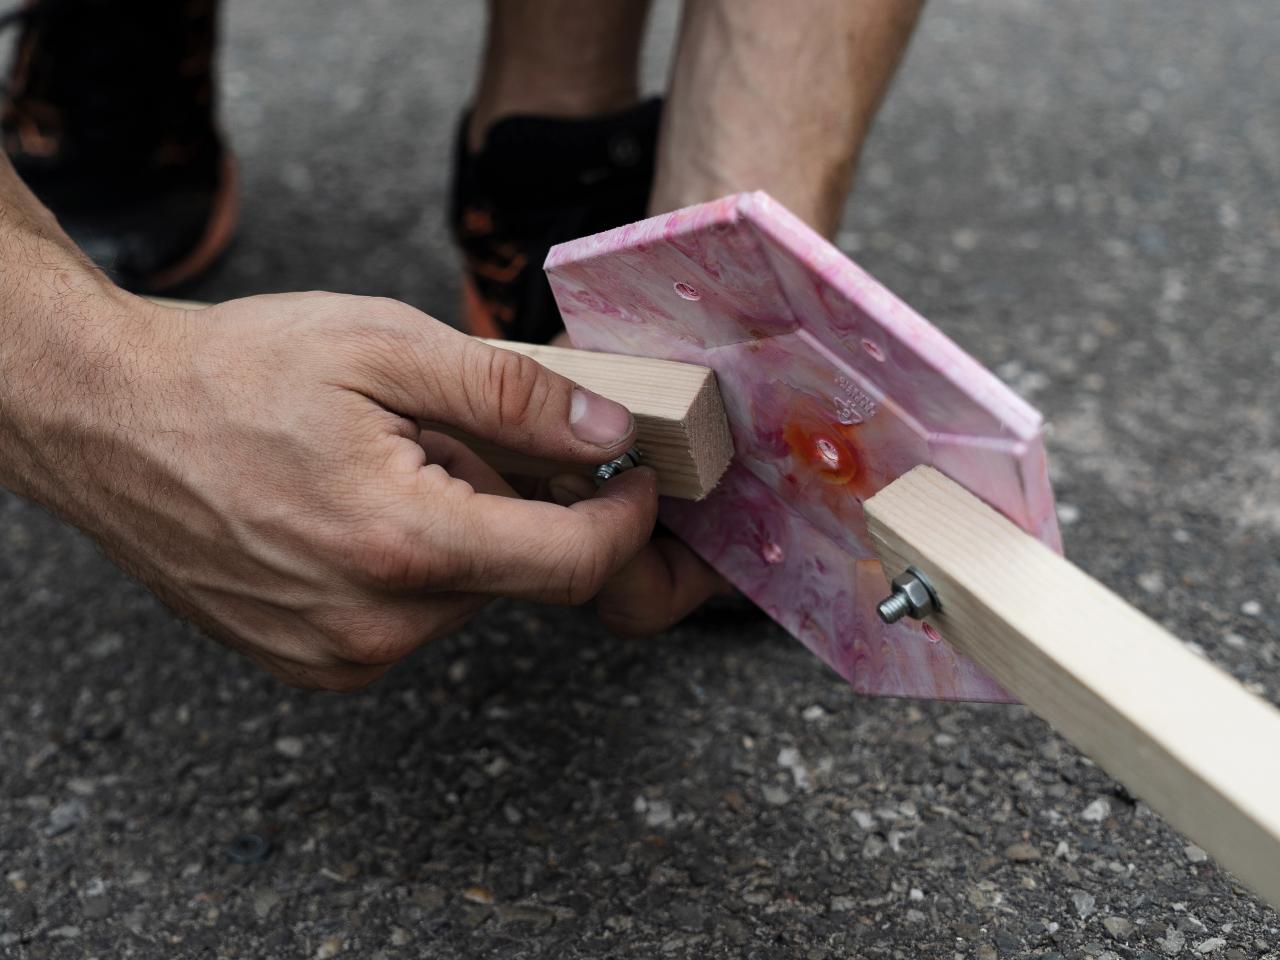
To finish the joinery, cut the extra material generated by the injection channel. Use a knife to clean the edges if needed. Then drill the M6 holes according to the marks on the joinery parts.
P.S. Always keep the plastic flakes for future use during the process!
P.S. Always keep the plastic flakes for future use during the process!
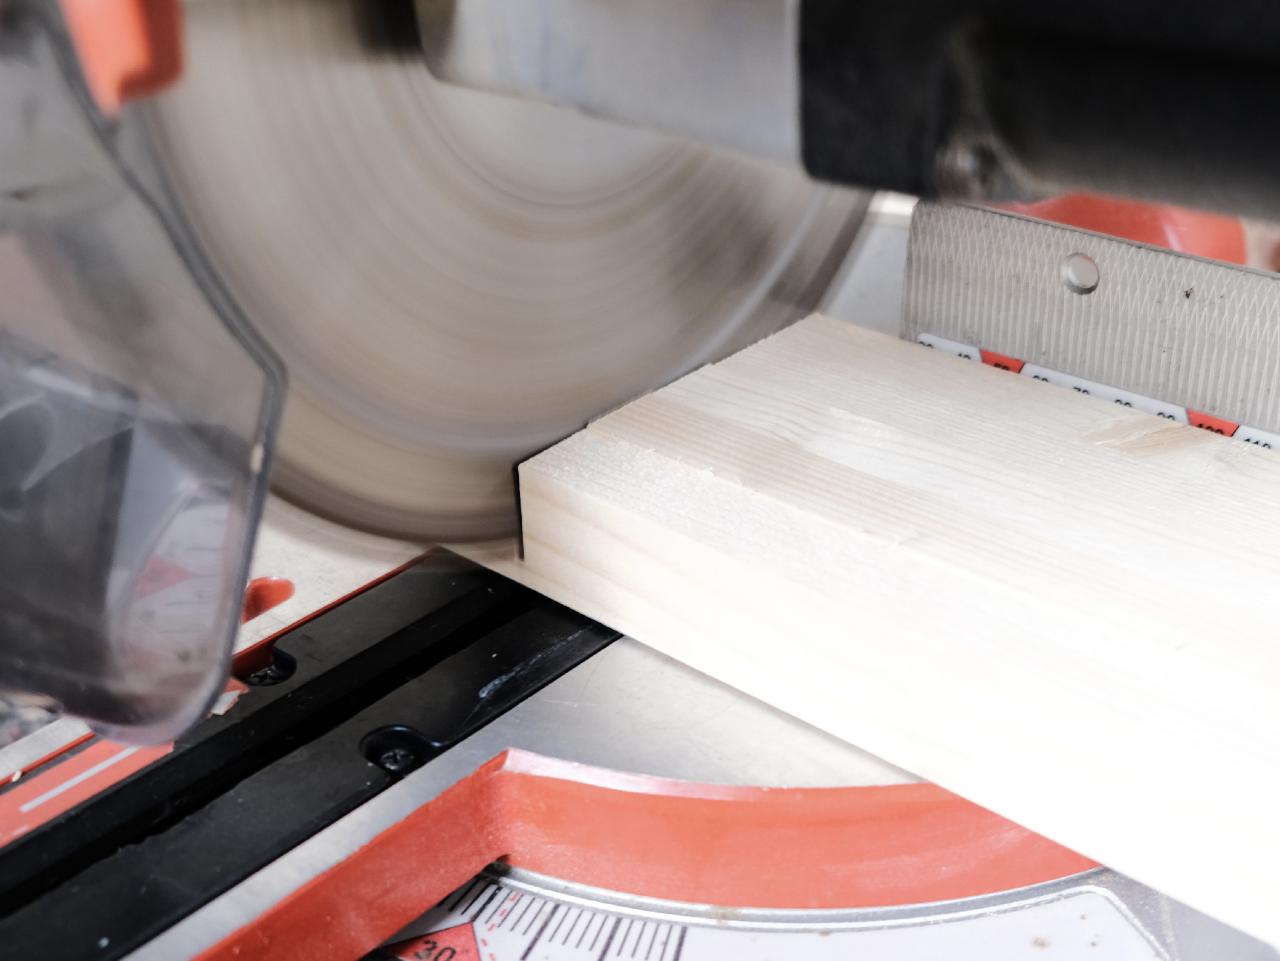
Step 6 - Prepare the beams
Take your beams (we used 20mm x 30mm) and cut them to the required lengths and amounts.
For our 2.5 m high dome, we need:
A: 1302 mm x 30
B: 1472 mm x 35
If you decided for another dome size, take the dimensions you’ve calculated.
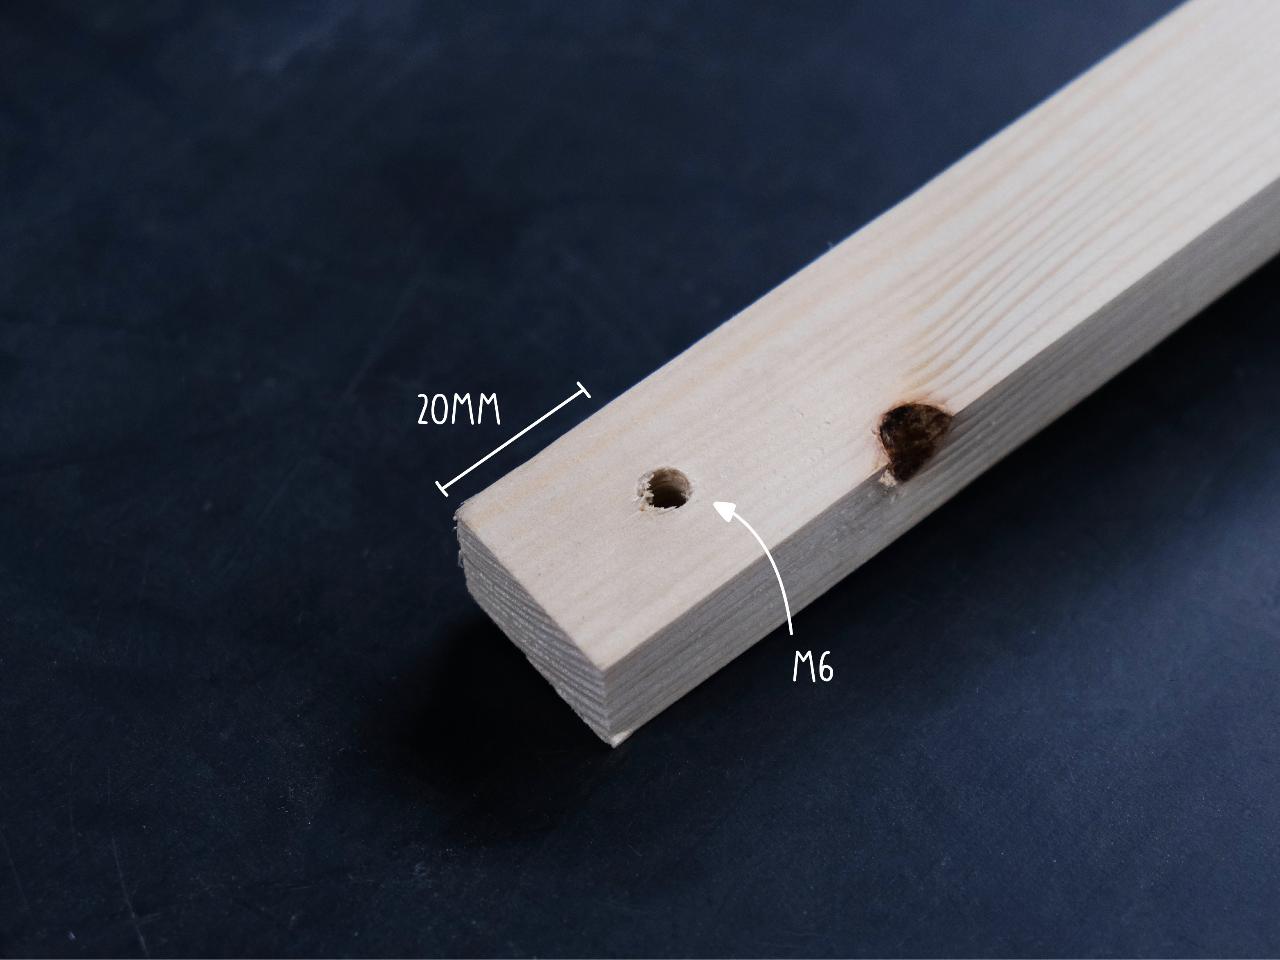
Once you have all your beams cut into the right size, drill M6 holes at both ends of all the beams. Place the hole in the middle of the width and 20 mm from the edge.
For our 2.5 m high dome, we need:
A: 1302 mm x 30
B: 1472 mm x 35
If you decided for another dome size, take the dimensions you’ve calculated.
Once you have all your beams cut into the right size, drill M6 holes at both ends of all the beams. Place the hole in the middle of the width and 20 mm from the edge.
Step 7 - Get ready for assembly
Now that you have all the components you can build your structure.
Gather the following tools and metal parts for for assembling:
- 2x 10 mm spanner
- 130x Bolts - M6 x 40 mm
- 130x Nuts - M6
- 260x Washers
- Hand Drill with M6 Drill Bit
Gather the following tools and metal parts for for assembling:
- 2x 10 mm spanner
- 130x Bolts - M6 x 40 mm
- 130x Nuts - M6
- 260x Washers
- Hand Drill with M6 Drill Bit
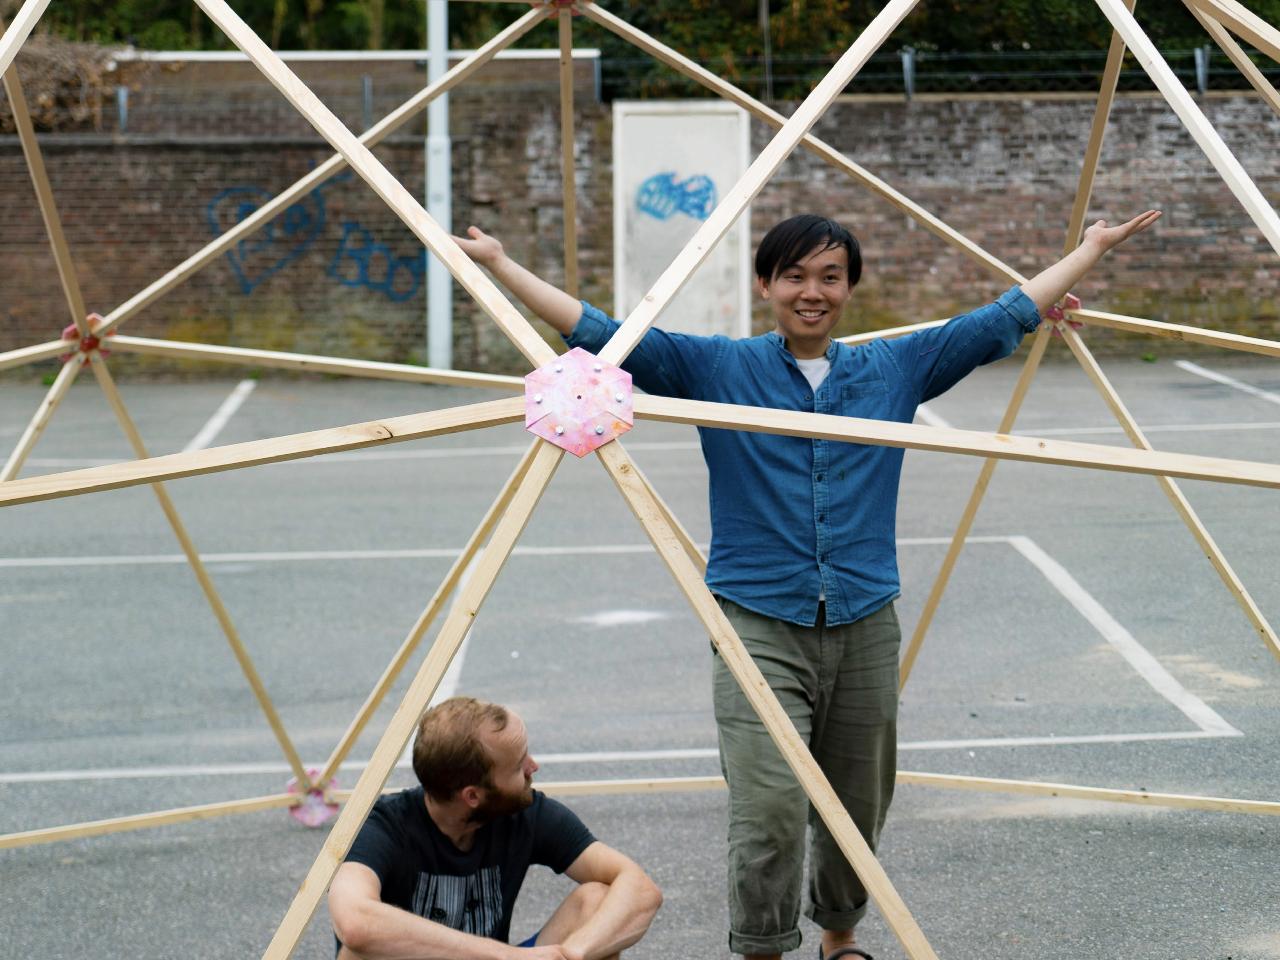
Step 8 - Assemble (Concept)
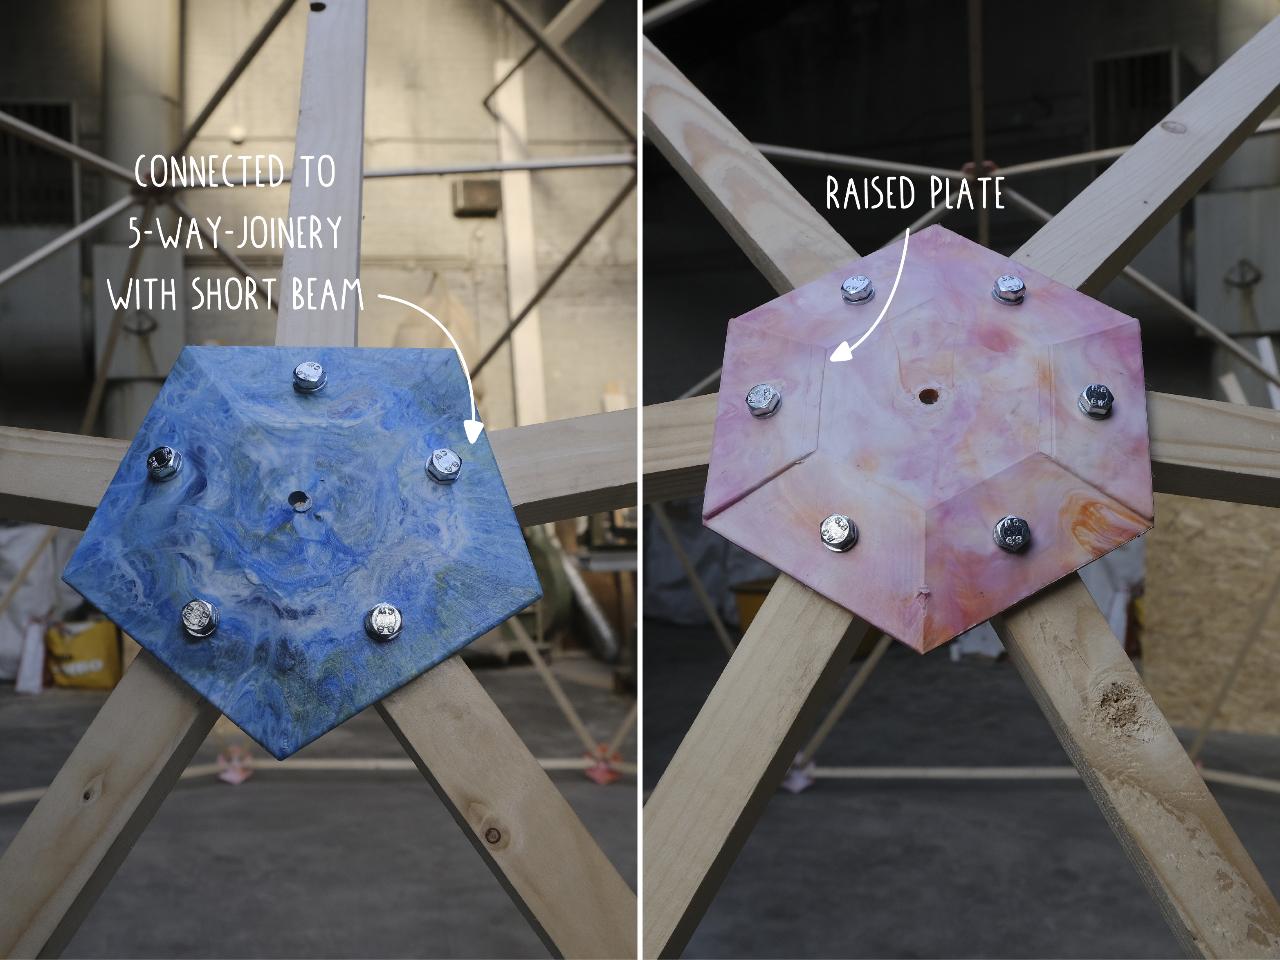
Finally it's time to assemble! Basically, the dome is made out of 6 pentagons which are connected with their edges. The raised plate in the 6-way-joint is connecting to the 5-way-joint, the rest is connecting to another 6-way piece.
Step 9 - Assemble (Part 1)
There are various ways to assemble, so feel free to try out your own.
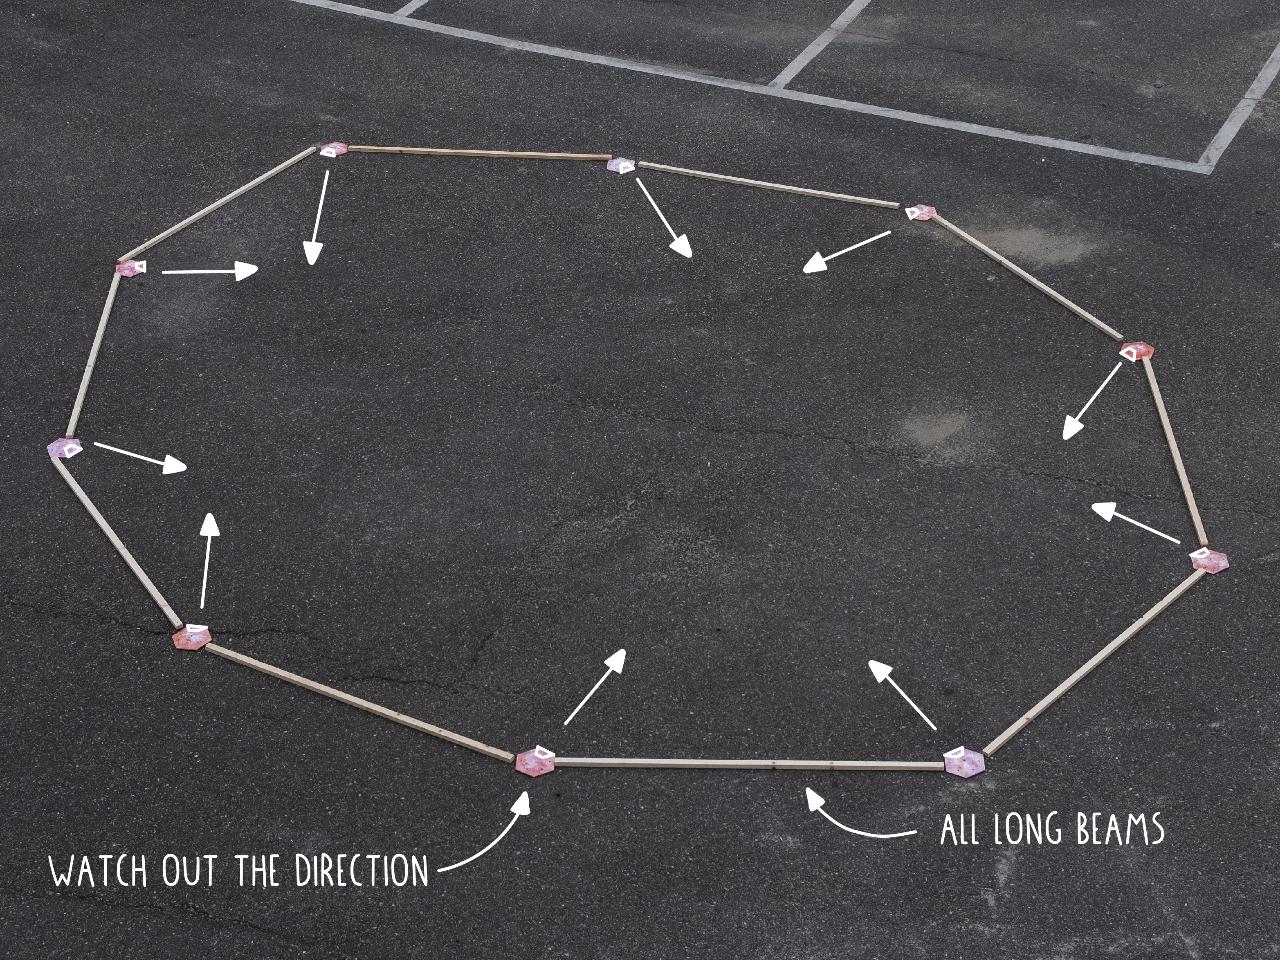
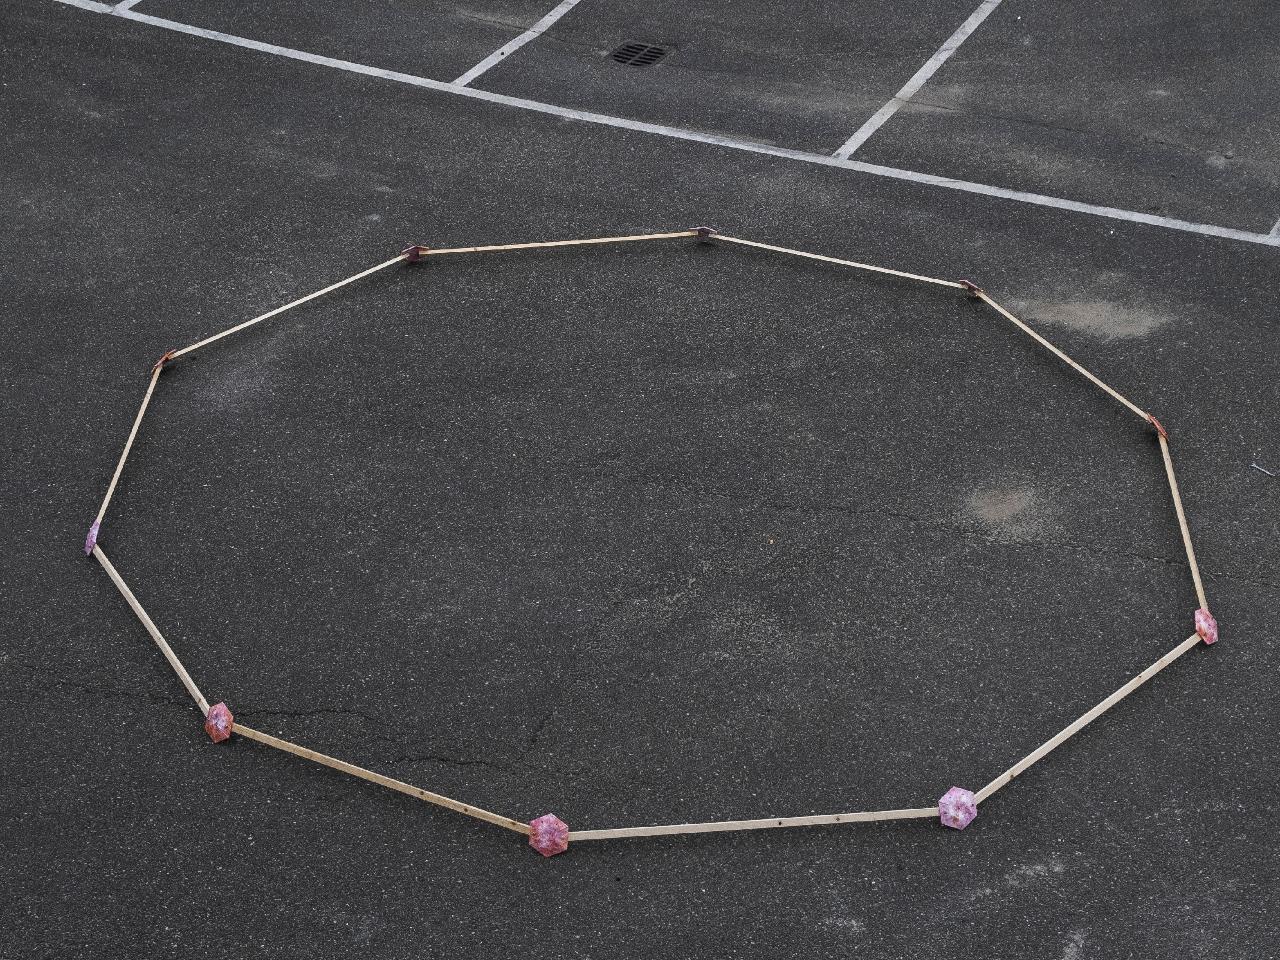
In this example, we'll start with the bottom level of the structure. Connect 10x 6-way-joints with 10x long beams into a decagon. Pay attention to keep all joints in the right direction.
6-way-joints: pink
5-way-joints: blue
In this example, we'll start with the bottom level of the structure. Connect 10x 6-way-joints with 10x long beams into a decagon. Pay attention to keep all joints in the right direction.
6-way-joints: pink
5-way-joints: blue
Step 10 - Assemble (Part 2)
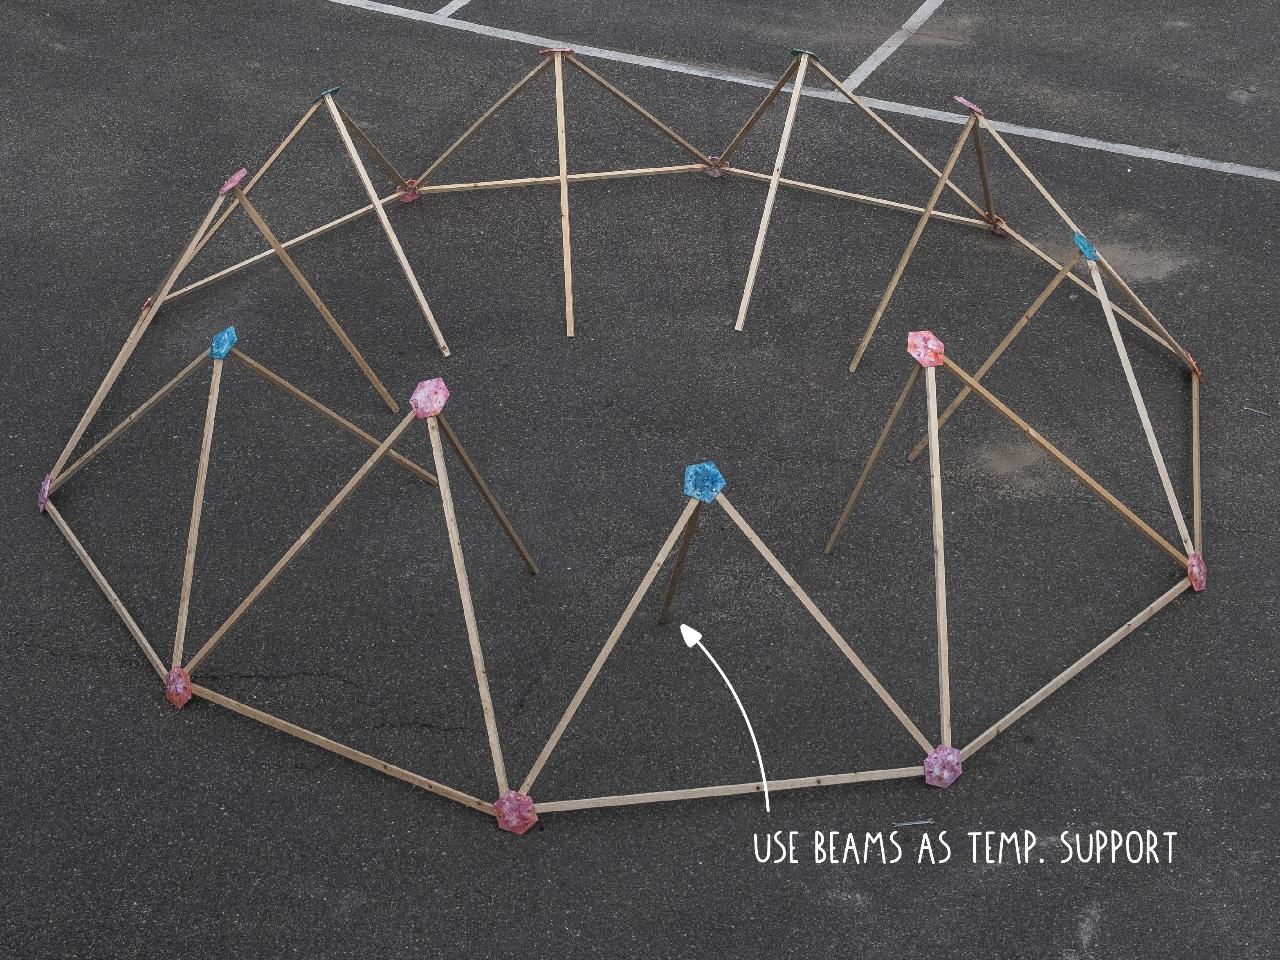
For the second level, connect 5x 5-way-joinery with 2x short beams and connect 5x 6-way-joints with 2x long beams to the first level. The 5-way-joints and 6-way-joints should be alternating. Then, connect all the joints on the second level with shorter beams.

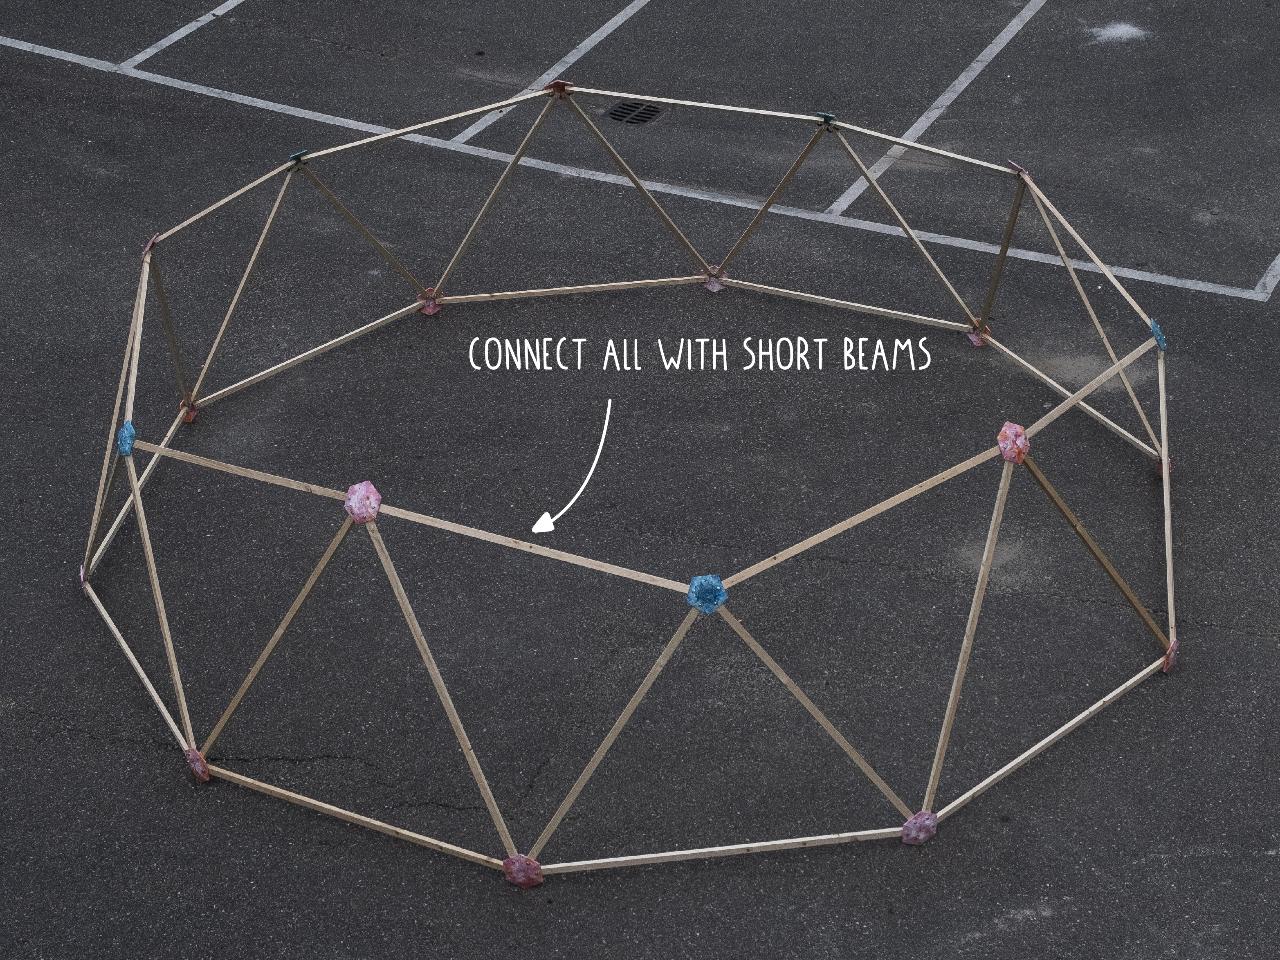
Step 11 - Assemble (Part 3)
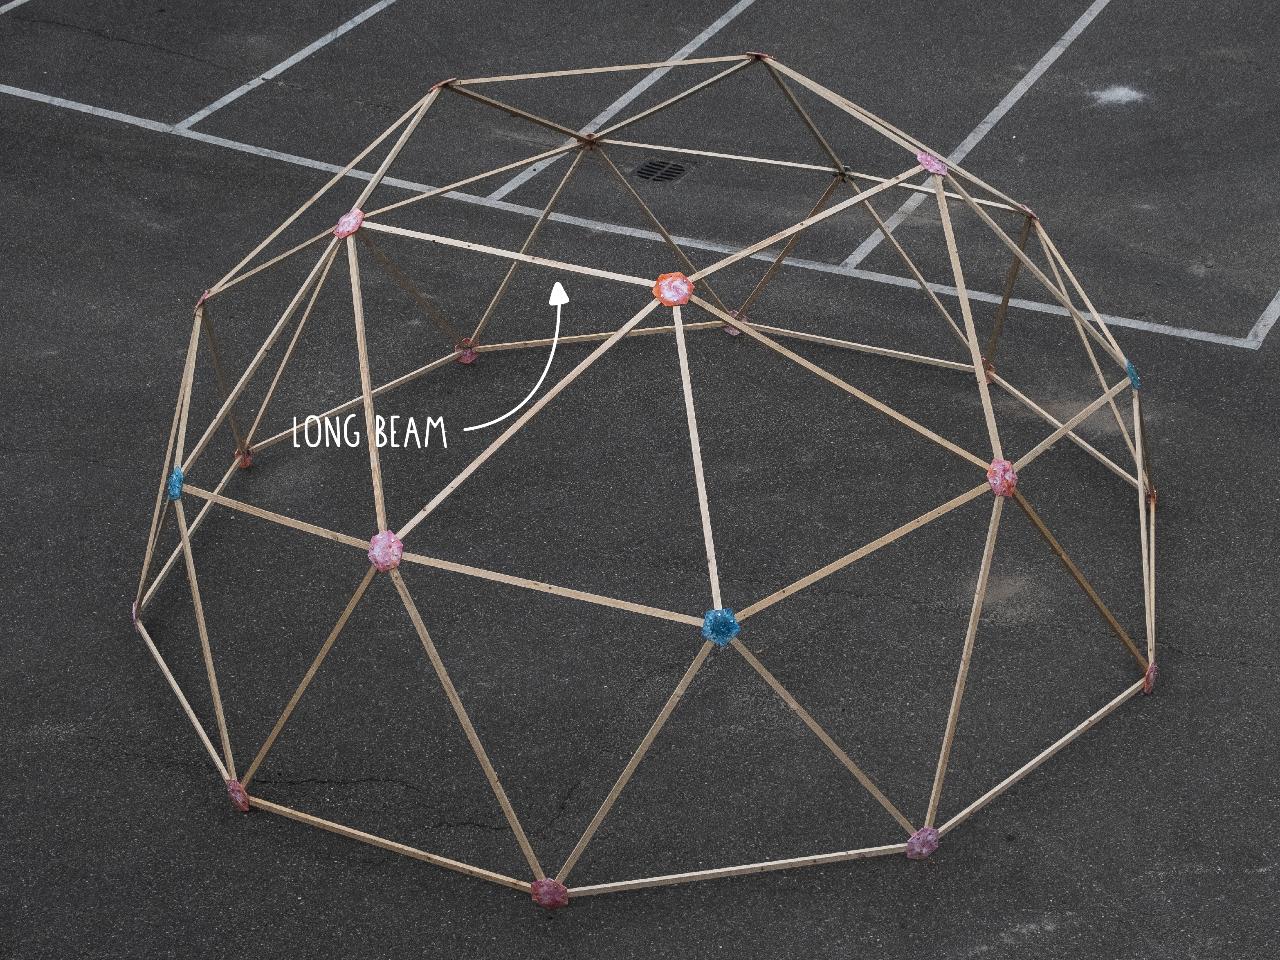
For the third level, connect 5x 6-way-joints to the second level. Use longer beams for connecting to a 6-way-joint and short beams for connecting to a 5-way.
For the fourth and last level, simply connect the remaining 5-way-joint with the 5 short beams.
For the fourth and last level, simply connect the remaining 5-way-joint with the 5 short beams.


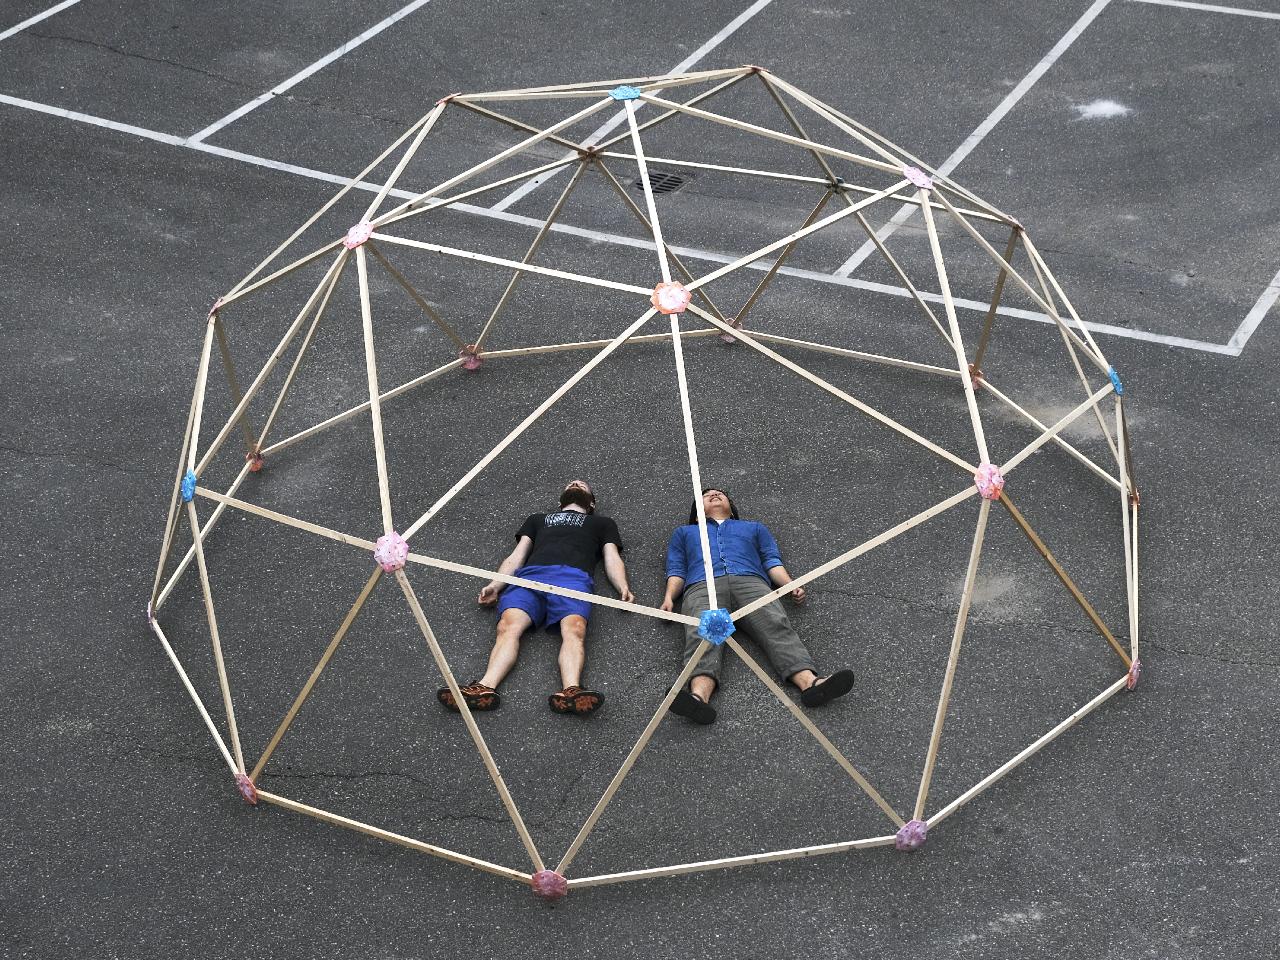
Step 12 - Explore the possibilities!
Your Geodesic Dome is done!
Feel free to play around with this structure like removing some beams to create an entrance, or trying out other variations of the construction.
You could also use other materials (like recycled plastic) for your beams or add surfaces in the triangle spaces.
Have fun exploring!
Feel free to play around with this structure like removing some beams to create an entrance, or trying out other variations of the construction.
You could also use other materials (like recycled plastic) for your beams or add surfaces in the triangle spaces.
Have fun exploring!
—
—
—
Comments