Make a lamp with beams
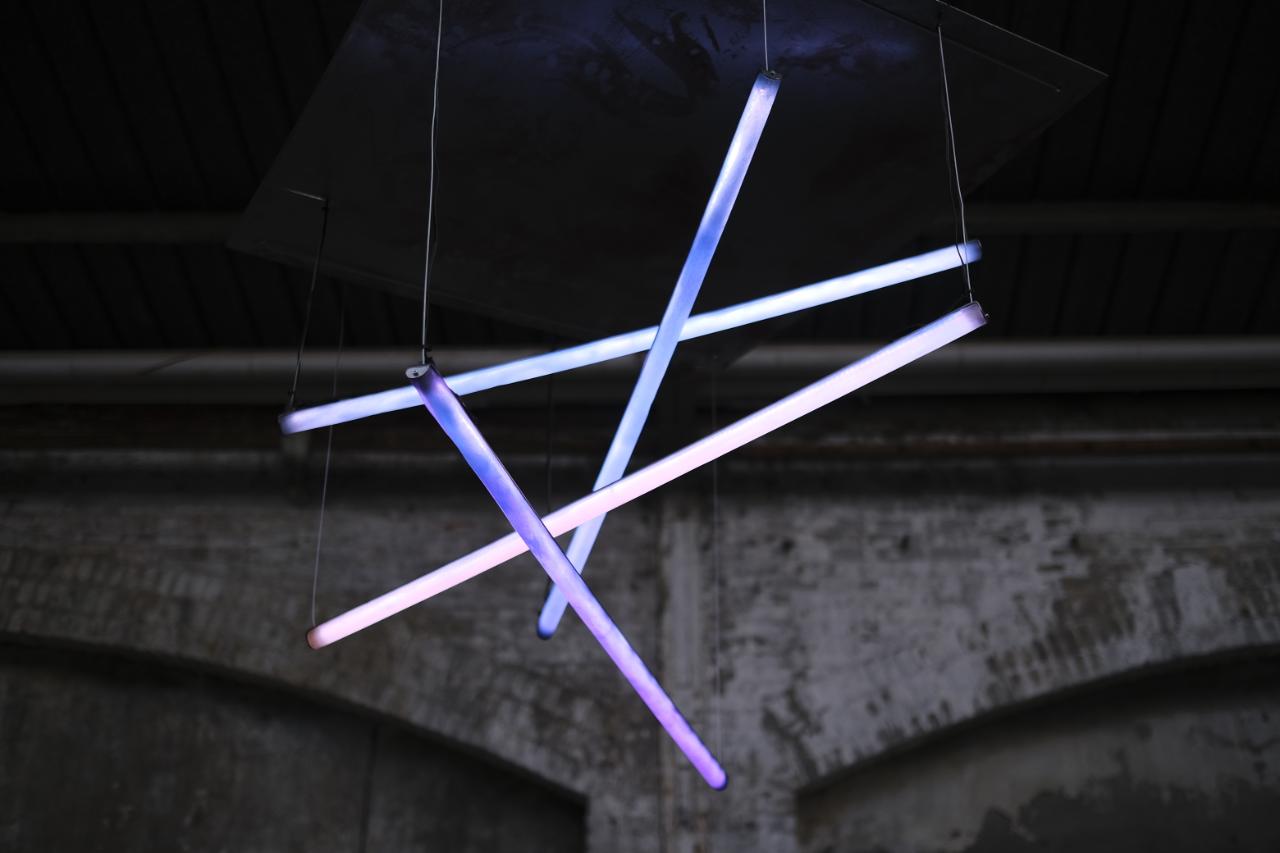
Ambient light made with the technique of extruded beam. Embracing the qualities of translucent polystyrene, giving what was once old CD cases a new life.
To make this lamp you will need a groove in your beam to place the LED stripe inside.
This How-to will explain:
Step 1-10: How to make two parts extrusion mould
Step 11-17: How to assemble the lamp
—
Attachments
Resources
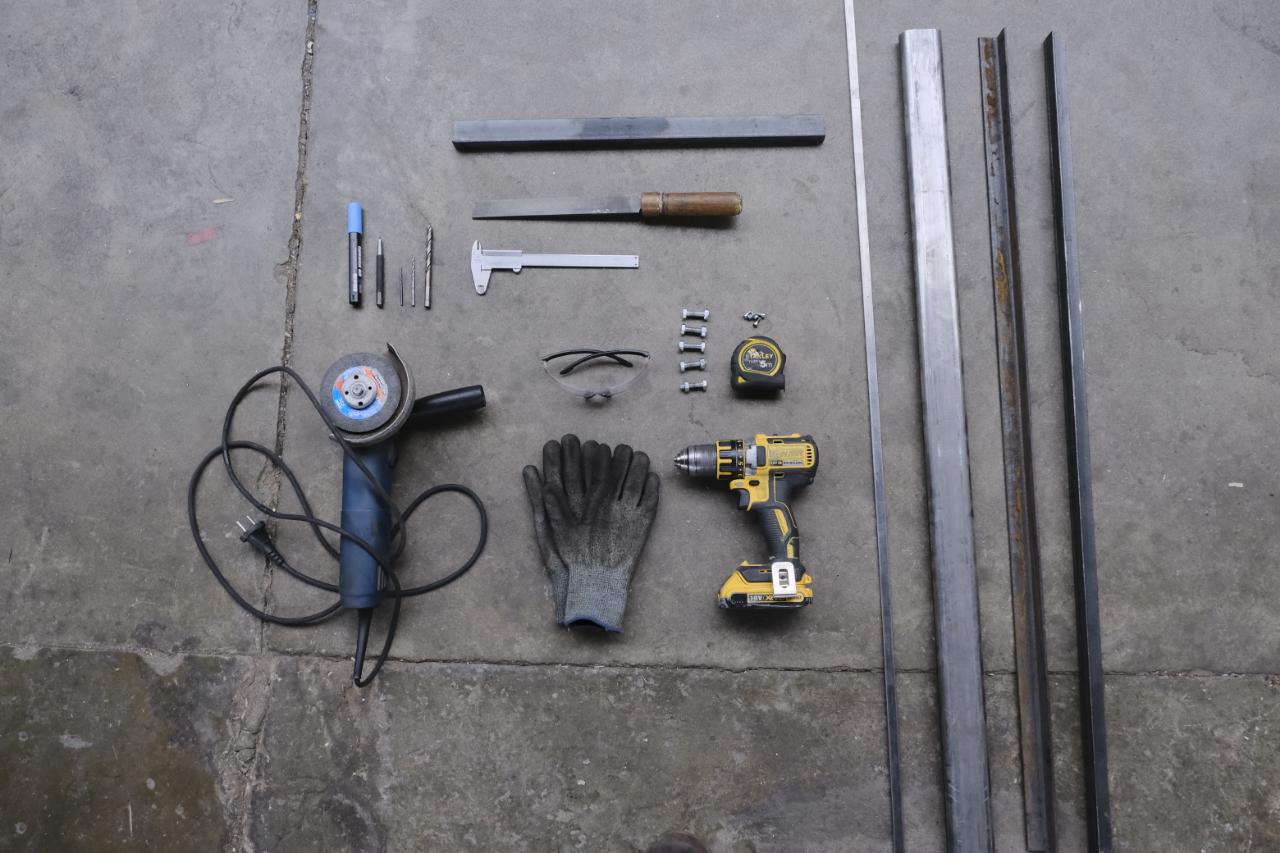
Step 1 - Get ready
Check out the attached material list and get your materials ready for the mould and making the lights.
Equipment:
- Metalworking tools/workspace
- Extrusion machine
- shredded PS
A quick tip: make sure you make your mold longer than your lamp length! The extreme ends are always on a low quality so it’s easier to cut them off. I would say at least 5 cm longer on each side.
Related links:
Extrude beams 👉 https://www.youtube.com/watch?v=zNGuuSKE1pY
Make glass-like beams 👉 https://community.preciousplastic.com/how-to/make-glass-like-beams
Step 2 - Choose your design
In our case, we wanted to obtain an ambient light.
After making a few tests we decided to cut the oval beam we found in the scrapyard to obtain a smaller profile and so allow the light to spread more equally.
Mark the height you want with a metal marking tool, then you can cut the beam with an angle grinder. Make sure to be accurate.
After making a few tests we decided to cut the oval beam we found in the scrapyard to obtain a smaller profile and so allow the light to spread more equally.
Mark the height you want with a metal marking tool, then you can cut the beam with an angle grinder. Make sure to be accurate.


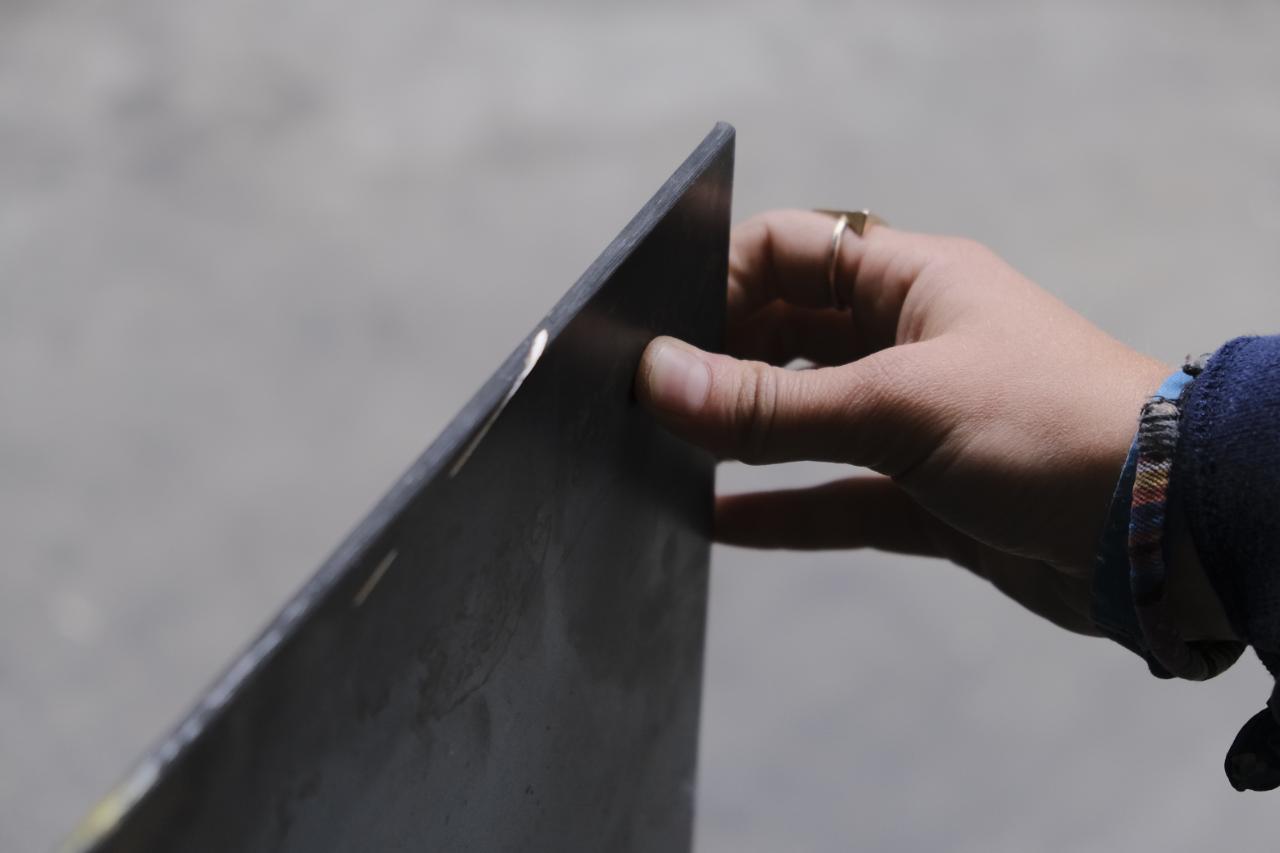
Step 3 - Prepare central bar
Cut the central metal bar to the right length.
Mark the centerline on the top of the bar and colour the sides, to help you send the right angle.
Make the 2-degree draft with a belt sander after setting the table with the right angle. Once you can’t see the color anymore means you sanded the entire surface.
This draft is really important! It will help you extracting your beam from the mould and preventing from cracking your piece as in this case we are working with polystyrene, which has the minimum shrinkage (0.4/0.7%) and it becomes quite difficult to extract from the mould.


Step 4 - Cut the rest of the material
Grab the 2 metal bars and cut them as long as the first piece.
Cut the sheet to the right length and width so it fits the u-profile and the bars on top of it.
Now cut the mounting brackets that will connect the mould to the nozzle.
Related link:
Extrude beams 👉 https://www.youtube.com/watch?v=zNGuuSKE1pY
Cut the sheet to the right length and width so it fits the u-profile and the bars on top of it.
Now cut the mounting brackets that will connect the mould to the nozzle.
Related link:
Extrude beams 👉 https://www.youtube.com/watch?v=zNGuuSKE1pY


Step 5 - Drill the metal bar
Now that we have all the materials cut it’s time to start building our first part mould!
Mark where you will drill the holes along the central bar, place it at the center of your sheet and tap weld the edges so it won’t move.
Clamp the pieces in the device so they are ready to drill. Placing a wooden block under the sheet will help to block the pieces while drilling.
Drill 3,3 mm holes along the bar (one each 100mm should be enough). Now you can remove the spot weld from the bar and enlarge the 3,3mm holes to 4mm holes on the sheet only. Finally, thread the holes on the bar to M4.


Step 6 - Fix the bar to the sheet
Clean and sand the bottom of the bar so it’s ready to insert the 4mm bolts to fix the metal bar on the sheet. Once it’s fixed you don’t have to remove it anymore. You will need the bolts to stick out of the bar so you can grind them off and make the top surface really flat and polish as this will show on your beam.
This metal bar will define the groove where you can insert the LED stripe plus it will prevent a big amount of manual work! You could also mill it by hand but it takes a long time and creates lots of microplastic!
To prevent the plastic to flow inside the bar you could place silicon on the side.
This metal bar will define the groove where you can insert the LED stripe plus it will prevent a big amount of manual work! You could also mill it by hand but it takes a long time and creates lots of microplastic!
To prevent the plastic to flow inside the bar you could place silicon on the side.


Step 7 - Weld the metal bars to the u profile
The order in which you make this mold is quite important as having the sheet ready will help you welding the bars and the U profile in the right place.
Set the components on the welding table, clamp the 2 metal bars on the top of the sheet, (the bars will lock the beam in the middle) make sure to clamp everything properly.
Firstly, tap weld the bars to the sheet (this will help you block the pieces), then you can start welding the bars along with the U profile stay, 50mm alternating each side, doesn’t need to be welded all length.


Step 8 - Drilling holes
Mark where you want the holes with a center pin along with the sidebars.
Before removing the tap welds, we are gonna drill 8mm holes along with the sidebars and the sheet to fit 8mm bolts.
It’s important to keep everything clamped together so we are sure the holes will match after disassembling and reassemble the 2 parts molds!
Now you can grind off the taps weld and take the 2 parts mould apart.


Step 9 - Welding mountain brackets
As the next step, we are going to weld the mounting brackets to both sides of the mold. Before doing that make sure the brackets match with your plate and the center of your beam matches the center of the plate.
You can find all the information you need to make a plate here:
Related link:
Extruded beams 👉 https://www.youtube.com/watch?v=zNGuuSKE1pY
Let’s proceed: Drill the holes on the brackets before welding.
We recommend to weld along the entire sheet's surface. The first welds were too small and the plastic flew out of the mold, so as pictures show, we had to weld another piece on top of the previous ones.


Step 10 - Finishing up
You made it! Before extruding make sure you clean both parts of the mold and put silicon oil to facilitate the extraction of the beam.
Assemble the 2 parts mould with nuts and bolts and connect your mold to the nozzle.
For better finishing, we recommend preheating your mould with heating elements or in the oven, or both!
Now it’s time to extrude and test your mould!
Relevant links:
Make glass-like beams 👉 https://community.preciousplastic.com/how-to/make-glass-like-beams


Step 11 - Gather lamp components
To make this lamp your will need:
- LED stripe 1m
- metal wires to hang your lamp (In this case 2 per lamp) with their connectors.
- power controller
- cable
- laser cut metal bar to cover LED
- 2 mm bolts 8mm long
- BEAM
- LED stripe 1m
- metal wires to hang your lamp (In this case 2 per lamp) with their connectors.
- power controller
- cable
- laser cut metal bar to cover LED
- 2 mm bolts 8mm long
- BEAM

Step 12 - Metal bar
To cover the LED stripe and hang the beam from the ceiling, we designed a metal bar that holds the pieces together.
We made drawings for lasercutting, for a better finish.
You will need to engrave the central lines to stick the LED stripe exactly in the middle, the sidelines to facilitate the bending, cut 5mm holes on each side where you will let the light cable pass through and cut 2.5mm grove which will allow to slot the metal cable through.
If you lasercut we recommend to send more than one piece as the unit price will get cheaper.
You can find the CAD file attached above.


Step 13 - Cut your beam
After extracting your beam from the mold cut the right length that will match your metal plate.


Step 14 - Bend the plate
Place the plate in the metal device along the line previously engraved and bend it with a hammer.


Step 15 - Prepare the beam and the bar
Before assembling everything together with 3mm bolts you will need to drill 3mm holes on both sides of the beam matching with the bar’s holes previously laser cut. You do this by clamping the beam together with the metal plate already bent.
After that take them apart and thread 3mm holes on the bar to fit the bolts. Finish off the beam, sand the edges and the sides so now you can insert the 4mm bolts on the sides to check if they match.
After that take them apart and thread 3mm holes on the bar to fit the bolts. Finish off the beam, sand the edges and the sides so now you can insert the 4mm bolts on the sides to check if they match.


Step 16 - Assemble
Once the 2 components are ready you can stick the LED to the metal bar, letting the metal cable first, and then the light cable passing through the holes.
Assemble the plate and the beam with the 3mm bolts and put a 5mm screw on the side with no light cable. This will prevent the metal cable from escaping.
Now solder the LED cable to the power controller!
Assemble the plate and the beam with the 3mm bolts and put a 5mm screw on the side with no light cable. This will prevent the metal cable from escaping.
Now solder the LED cable to the power controller!


Step 17 - Play with the colours :)
You're done!
Depending on your LED strip you can now program your light, intensity, color, etc. with Arduino.
A guide explaining how to program the board can be found here: https://fablab.ruc.dk/ioglow/
You can find the relevant Arduino code in the download files.
Once your board is programmed then you can change the LED settings from your phone connecting to the board’s wifi.
Well done you made it!
Plugin your light and hang it to your ceiling!


—
—
—
Comments