Wash plastic: Pre-wash
Plastic needs to be clean before shredding to make the maintenance of the machine easier. Here we are going to explain how to build an easy pre-washing machine to get rid of the rough dirt.
This machine integrates into a system with a sand filter and a washing machine.
—
Attachments
Resources
Step 1 - Why not to wash everything by hand
In a small scale, it can make sense to wash your plastic by hand with a brush and some soap. As soon as we have a bigger amount of dirty plastic though it isn’t economical anymore. It takes a lot of time and uses a lot of water
So integrating a semi-automatic machine with a sand filter helps a lot. The water is constantly cleaned and can be used for a long time. As we don’t work on an industrial level, there is still plenty of manual work involved, but it is still a much more efficient solution.
So integrating a semi-automatic machine with a sand filter helps a lot. The water is constantly cleaned and can be used for a long time. As we don’t work on an industrial level, there is still plenty of manual work involved, but it is still a much more efficient solution.
Step 2 - Get your materials
For the pre-washing machine, we are going to need:
- a 120 litre HDPE barrel
- circa 13 m steel profile (30x30mm)
- 1120 x 16 mm steel pipe
- 300 x 30 mm flat steel
- some wood for the wooden board
- four casters and fittings according to the sand filter
- two ball valves
- and flexible pipes (also according to the sand filter)
- a motor with around 0.5 kW and 1500 r/m (can also be stronger)
- a frequency inverter fitting to the motor
Optional:
- another 120 liter HDPE barrel
- two more ball valves
- heating element and PID controller
Step 3 - Prepare the barrel
We start by preparing the barrel.
All you have to do is remove the handles and drill two holes. One at the very top and one at the bottom of the barrel, so you are able to pump out all the water.
Use a 35 mm Forstner drill bit for the holes. Now you can attach the fittings.
All you have to do is remove the handles and drill two holes. One at the very top and one at the bottom of the barrel, so you are able to pump out all the water.
Use a 35 mm Forstner drill bit for the holes. Now you can attach the fittings.
Step 4 - Build the mobile base
To be able to move the barrel (filled with water), we build a solid board with some casters.
Cut wood plates to size, make sure they are strong enough to carry at least 100 kg and attach fitting casters. In the middle we need a hole, so the water outlet has a way to go.
Cut wood plates to size, make sure they are strong enough to carry at least 100 kg and attach fitting casters. In the middle we need a hole, so the water outlet has a way to go.
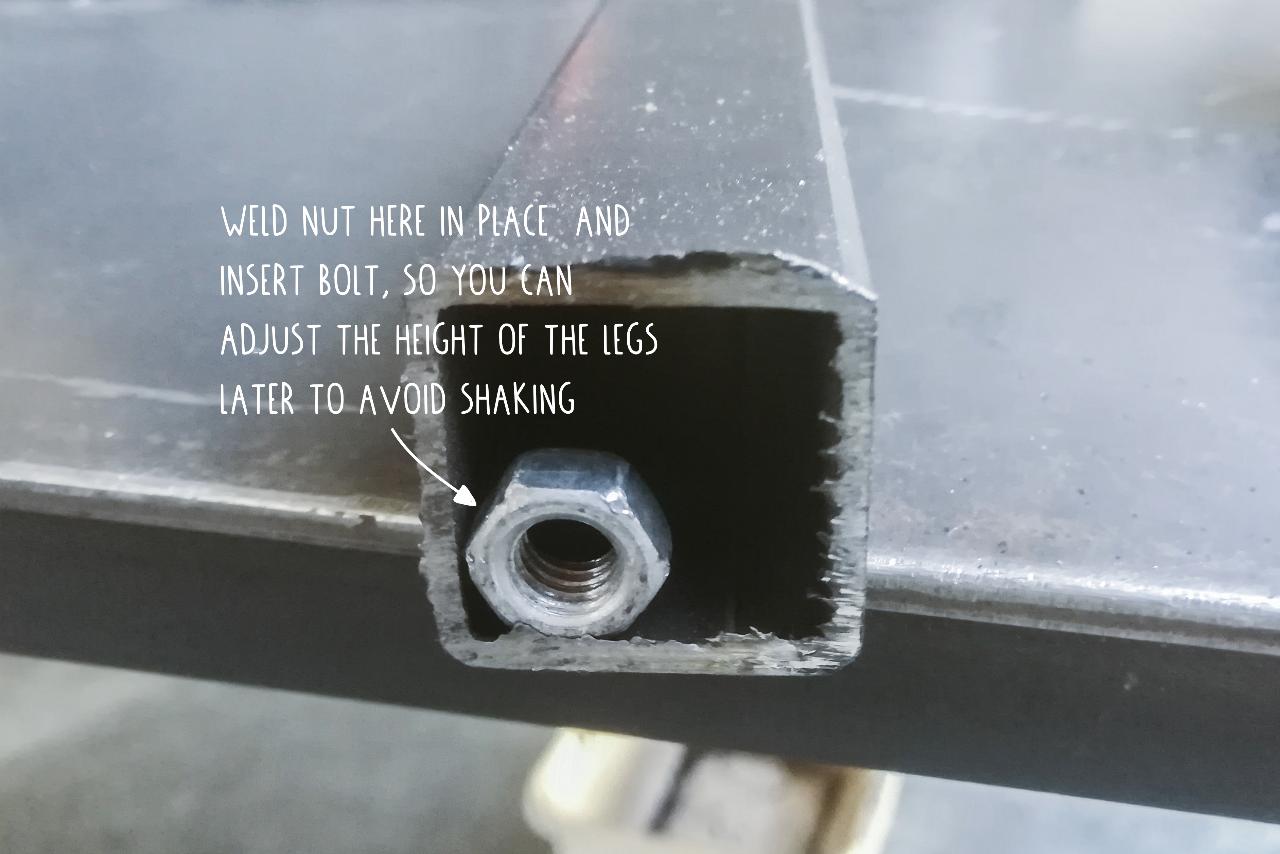
Step 5 - Build the frame
To build the steel frame is a simple welding job. Cut your steel tubes according to the measurements in the picture.
Drill two 17mm holes above each other in the centre of the frame to add profiles which will keep the mixer shaft in a vertical position.
To ensure that the frame always stands stable and straight, weld four nuts into the legs and add bolts with which you can adjust the height individually.
Once everything is done, give it a proper paint job, to prevent it from rusting (as it can get very wet).
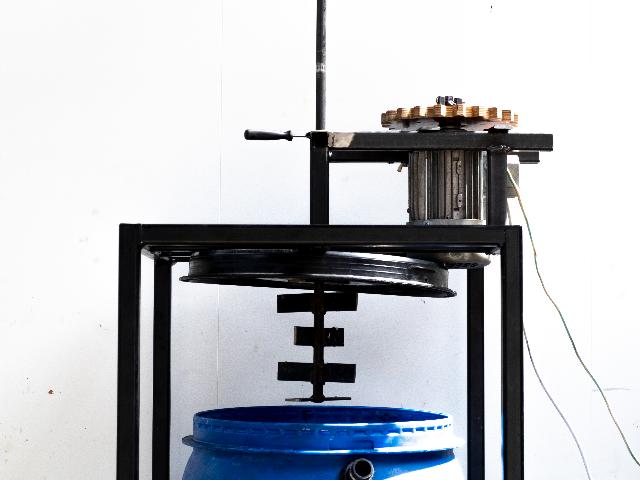
Step 6 - Build the mixer
The mixer should move the dirty plastic through the water. After some experiments and tests, this seemed to be the most efficient design for us. Short “arms” ensure that the plastic gets mixed without getting stuck.
Weld the metal sheets to to the steel pipe as shown.Drill two ø8mm holes on different heights of the steel pipe, so it can be fixed in two different positions: One to mix and one to move the barrel out underneath it.
You will also need a smaller hole to attach the gear later, but the location depends on how you will connect it. When done, paint it properly (or even better is to use stainless steel, because the friction will remove the paint fast).
Finally, drill a 20 mm hole in the centre of the lid, so the mixer can enter the barrel.
Step 7 - Attach the motor
Attach the motor parallel to the mixer shaft. The position and the way how you do it depends a lot on your motor, but in general it is pretty straight forward.
Once the motor is fixed, connect it with the frequency inverter, so you are able to change the speed later on.
Once the motor is fixed, connect it with the frequency inverter, so you are able to change the speed later on.
Step 8 - The gear
The connection between motor and shaft is very simple: Two same sized gears from multiplex - one fixed to the motor, the other one on the shaft which can be lifted up.
The connection to the shaft is made in a very simple way, as you can see on the pictures, but feel free to use a more conventional method.
The connection to the shaft is made in a very simple way, as you can see on the pictures, but feel free to use a more conventional method.
Step 9 - Extra barrel with a heating element
Some contaminants, especially oil and fat, are difficult to remove without warm water. Furthermore it’s very useful to have a second barrel to pump in the water from the first barrel if you need to clean it or reach plastic on the bottom.
We prepare this barrel in exactly the same way as in step 3, but add a heating element and a PID controller. Heating elements can come in many forms, for example from deep fryers. You need to find solid, waterproof way to connect it to the barrel.
Afterwards, place the thermometer from the PID in the tank and connect the pipes to the system.
Step 10 - How to pre-wash
Now it is time to connect all the pipes to the barrels and the sand filter. Fill up with water and you are good to go. Before using the pre-washing machine, we recommend to reduce the size of bigger plastic pieces and to remove the very rough dirt like sauces etc.
Mix the water in the pre-washing machine with laundry powder or soap, turn on the sand filter so there is a constant loop of water splashing at the plastic and let the motor run.
After a few minutes, your plastic should be clean enough to shred. You can experiment with temperature, the amount of soap and the motor speed.
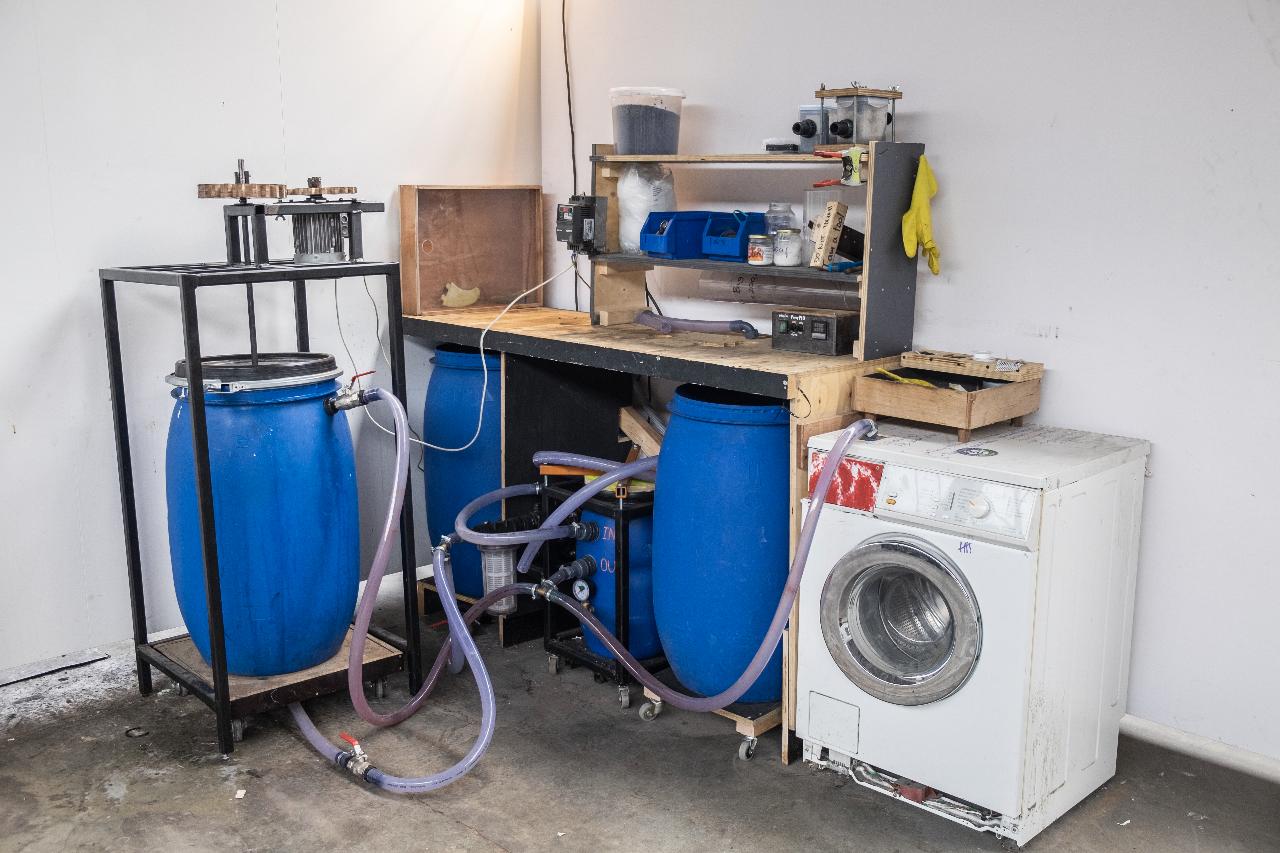
Step 11 - Complete setup
Nice one, you're ready to pre-wash :)
To build the complete setup with sand filter and washing machine, have a look at our How-To's here:
Wash plastic: Sand filter
👉 https://community.preciousplastic.com/how-to/wash-plastic-sand-filter-
Wash plastic: Washing machine
👉 https://community.preciousplastic.com/how-to/wash-plastic-washing-machine
—
—
—
Comments