Wash plastic: Sand filter

Washing plastics is a pretty dirty process. We’re dealing with organic contaminants, chemical waste but also lots of micro plastics. Being able to filter this water is very important.
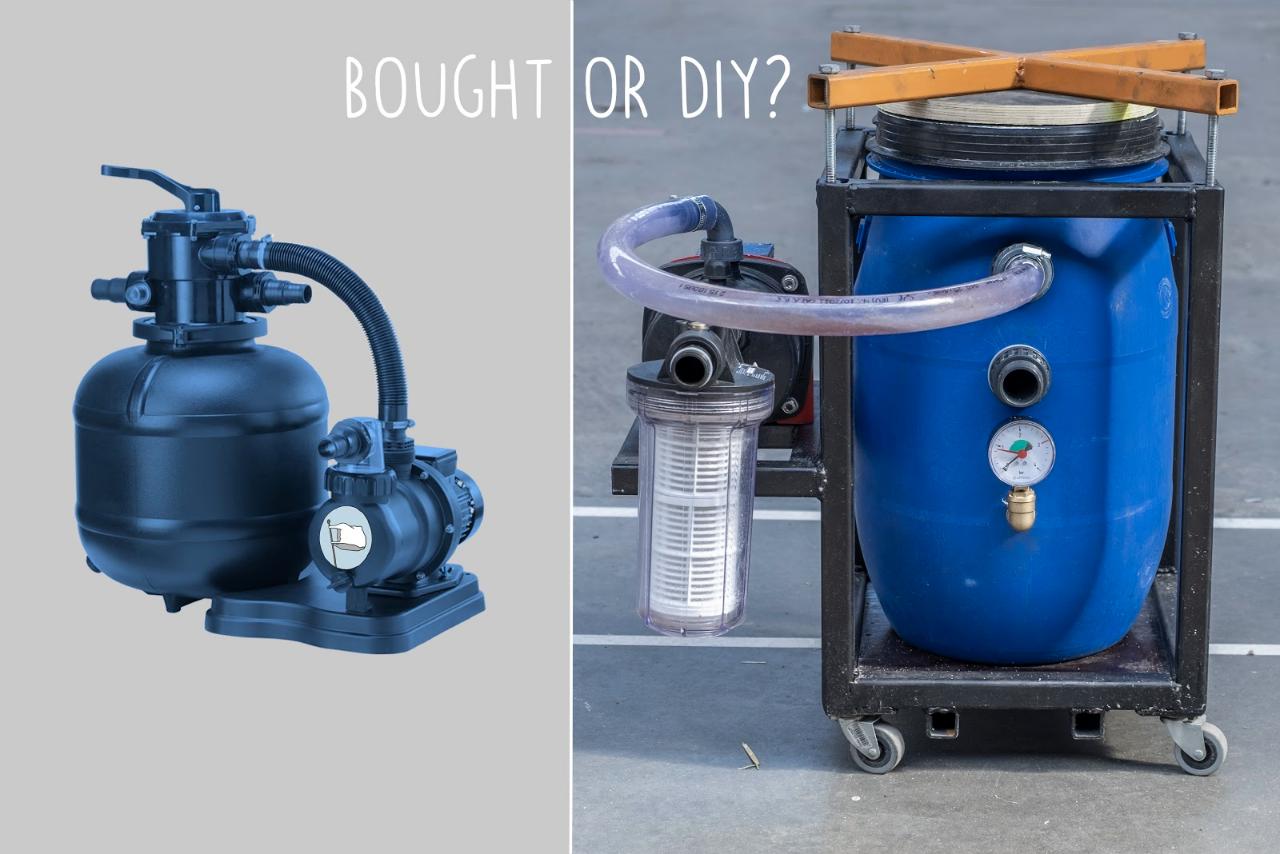
There are many different filters, but a pressurised sand filter (Rapid Sand Filter) proved to be the most effective and accessible choice. Here we will explain how you can build and run it.
This machine integrates into a system with a pre-washing and a washing machine.
—
Attachments
Resources
Step 1 - Why a sand filter and how it works
There are many types of filters and most of them (at least the simple ones) work with sort of a membrane, which keeps the dirt. The big problem with these is though, that they will eventually clog up and then need to be cleaned or replaced. On top of that, they can be quite expensive and hard to get.
The process of rapid sand filtration uses filter sand as a membrane, which is way easier to get. Dirty water is pumped through a thick layer of sand, which keeps a high amount of contaminants. The advantage of this filter is that the sand is easy to clean through a process called backwashing. Big versions of it are used in public water recycling facilities, but there is also a smaller version used to clean swimming pools, which is more interesting for us.
So there are two options, either buy one or make one. We recommend to first check out what’s available (to save time and maybe even costs), but here we provide a manual for everyone who want or have to build it themselves.
Step 2 - Get your materials
For this size of the filter, we are going to need:
- 30 litre HDPE barrel
- PVC pipes, fittings and one-inch hoses
- silicone or another flexible sealant
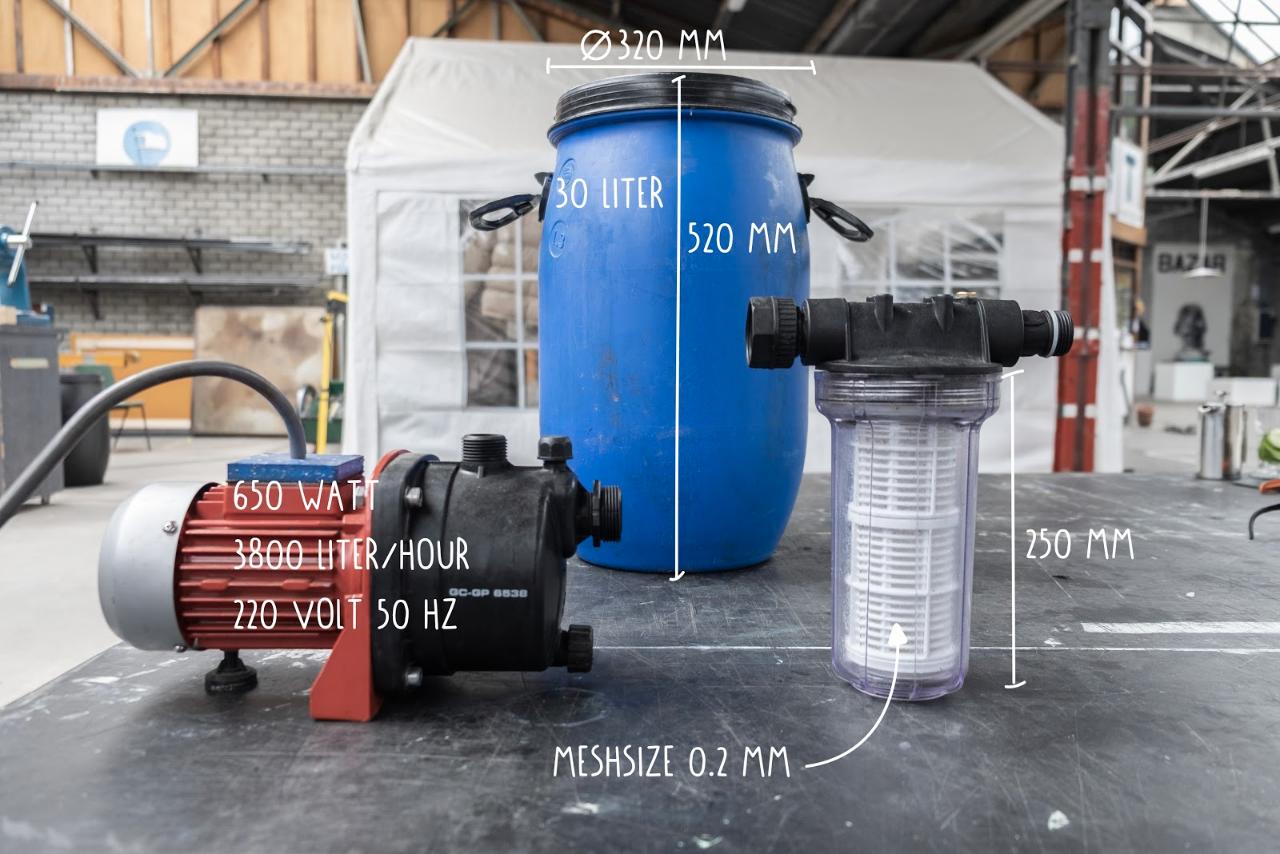
- a pump with roughly 650 watts and 3800 litres/hour flow rate (though any similar sized garden pump should work)
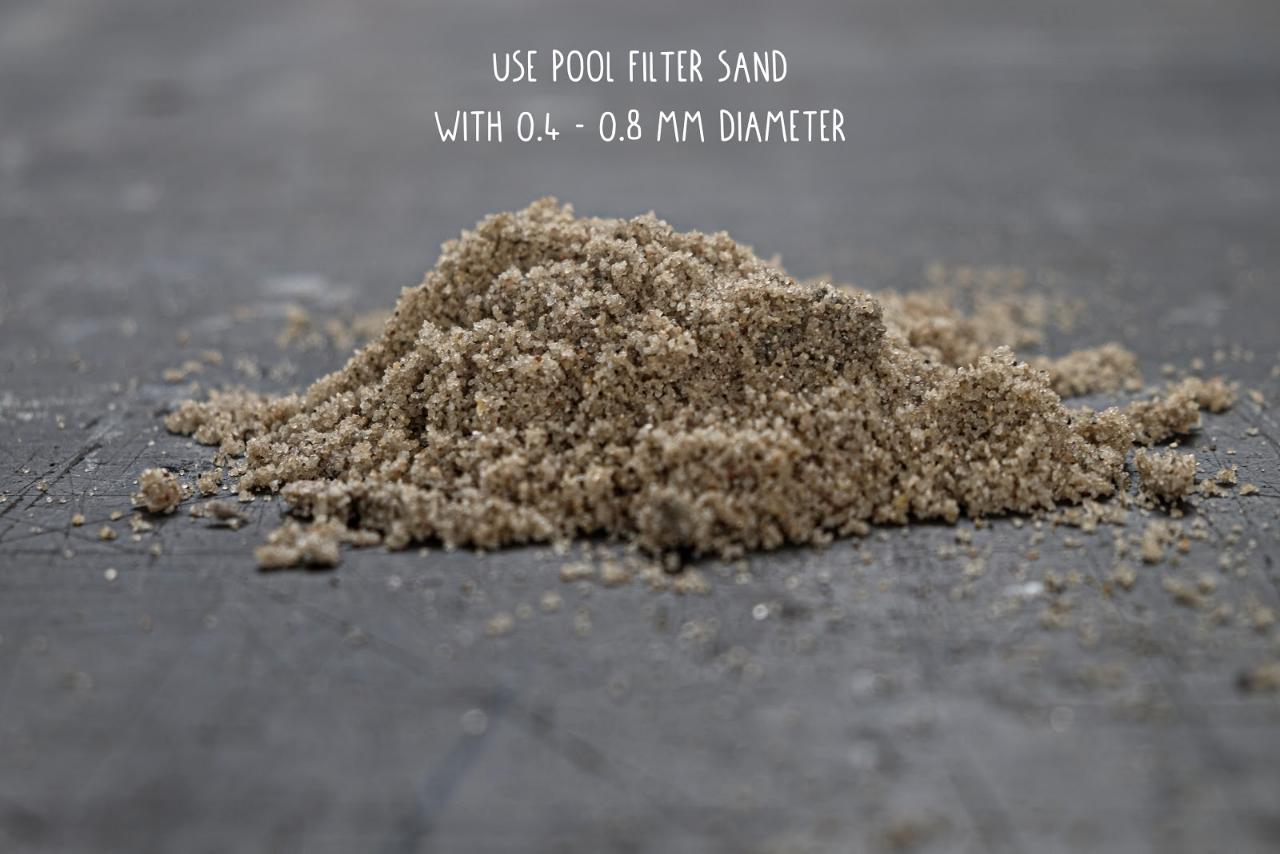
- filter sand, grain size 0.4 - 0.8mm
- a pre-filter to avoid big contaminants to clog up the pump
- a waterproof manometer with a pressure range between 0-3 bar
- roughly 7m steel profiles (30x30)
- 6x 8mm bolts
- 4x casters
Tools:
- drill
- saw
- aligator wrench
- hot air gun or oven (to heat up plastic)
- welding machine
- 30 litre HDPE barrel
- PVC pipes, fittings and one-inch hoses
- silicone or another flexible sealant
- a pump with roughly 650 watts and 3800 litres/hour flow rate (though any similar sized garden pump should work)
- filter sand, grain size 0.4 - 0.8mm
- a pre-filter to avoid big contaminants to clog up the pump
- a waterproof manometer with a pressure range between 0-3 bar
- roughly 7m steel profiles (30x30)
- 6x 8mm bolts
- 4x casters
Tools:
- drill
- saw
- aligator wrench
- hot air gun or oven (to heat up plastic)
- welding machine
Step 3 - Drill holes in the barrel
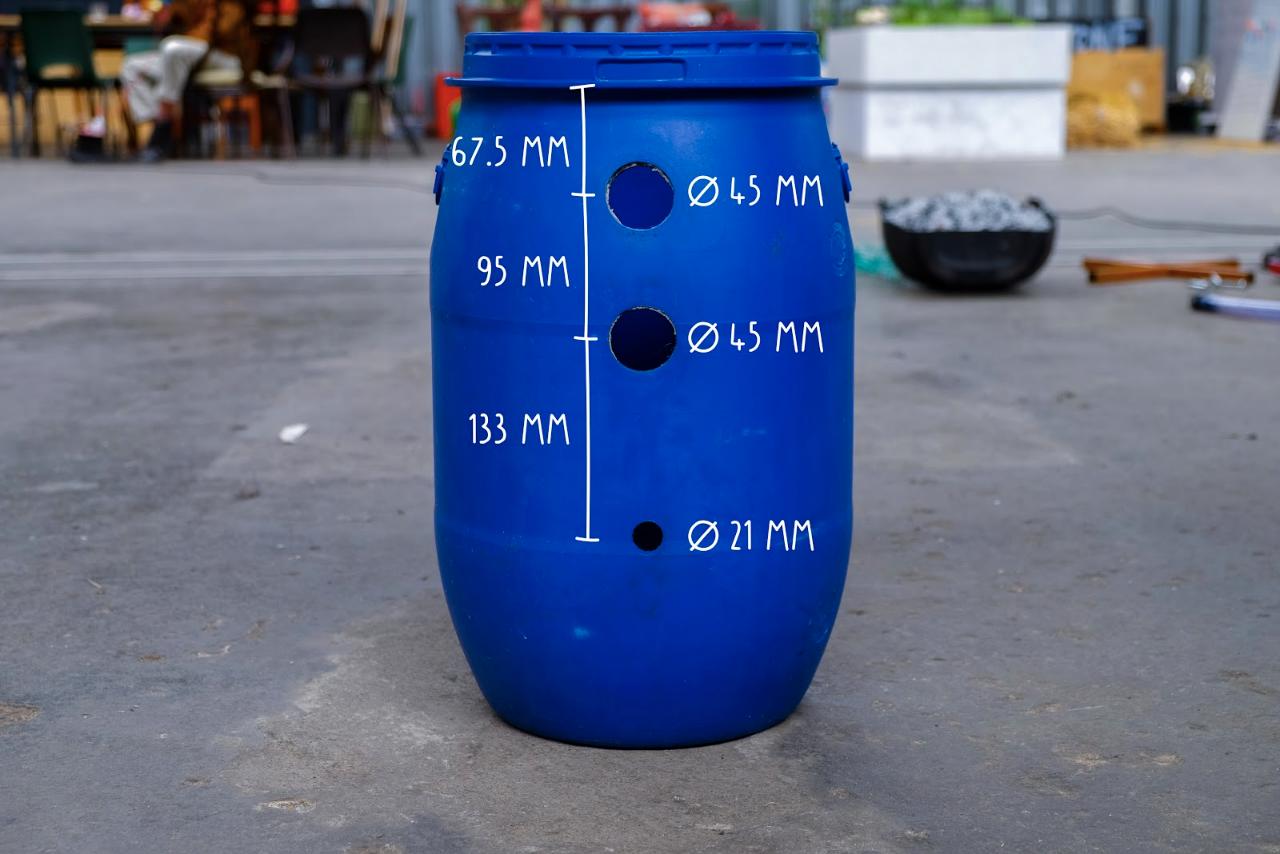
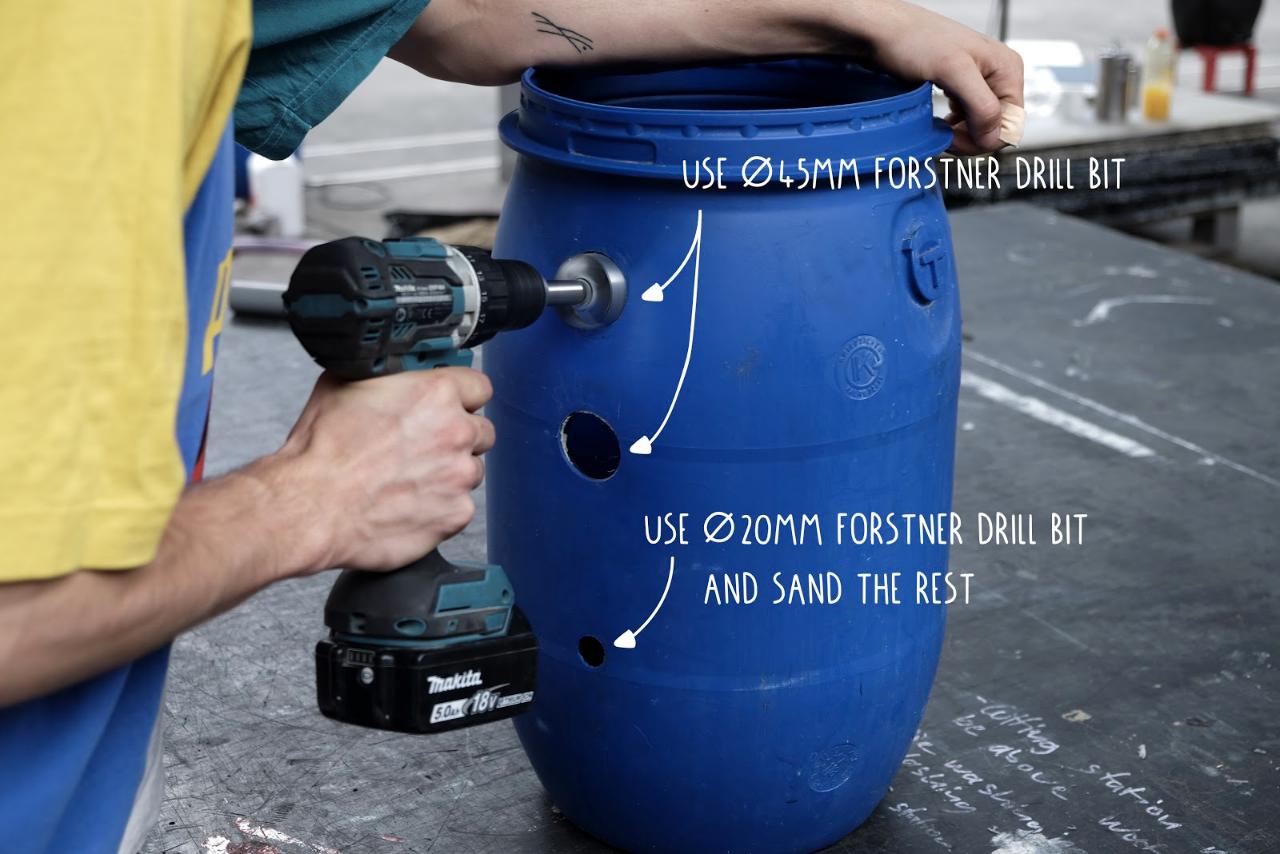
We start by preparing the barrel. All you have to do is remove the handles and drill three holes.
Mark the centres of the holes according to the measurements on the picture. Try to use a 45 mm Forstner drill bit for the big holes and a 20 mm one for the smaller hole (you can easily sand off the extra milimeter).
Mark the centres of the holes according to the measurements on the picture. Try to use a 45 mm Forstner drill bit for the big holes and a 20 mm one for the smaller hole (you can easily sand off the extra milimeter).
Step 4 - Build the inside with PVC pipes
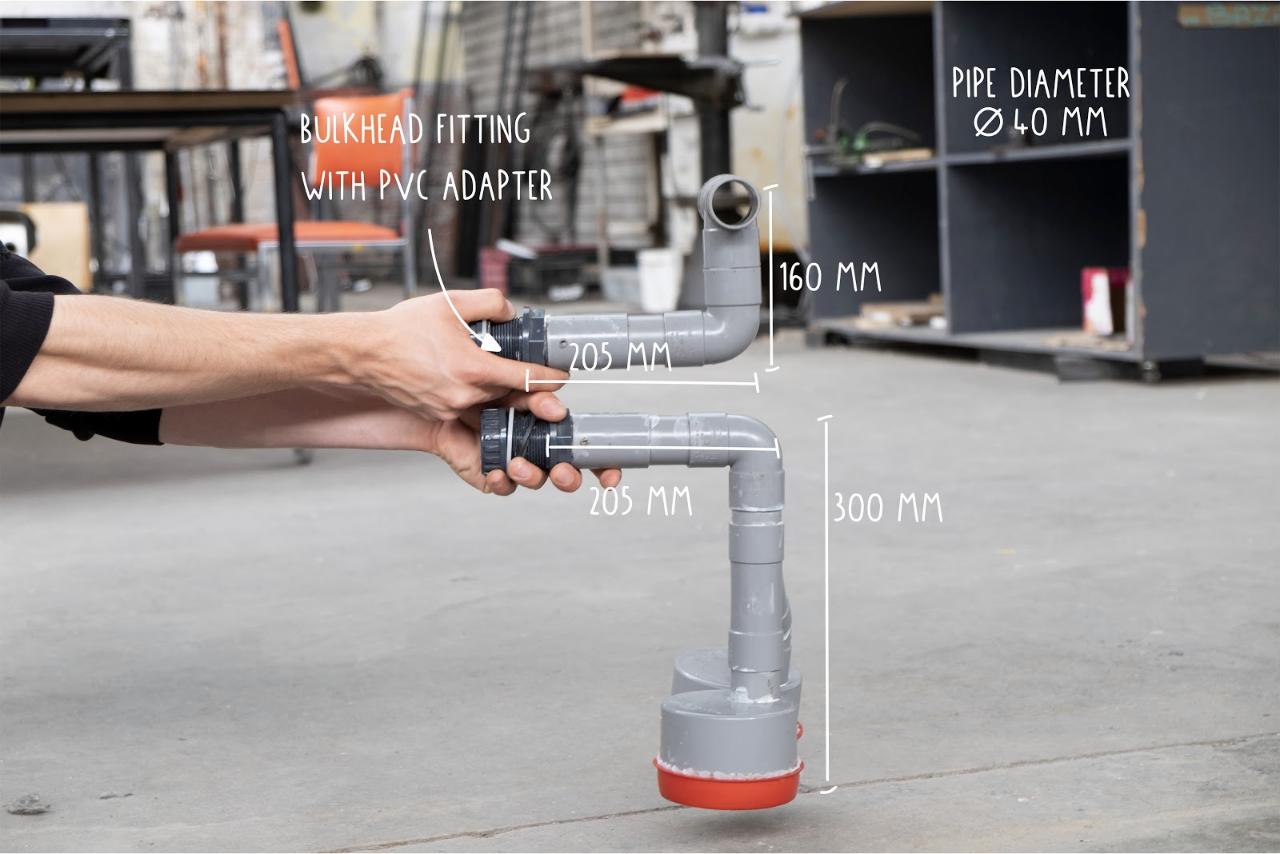
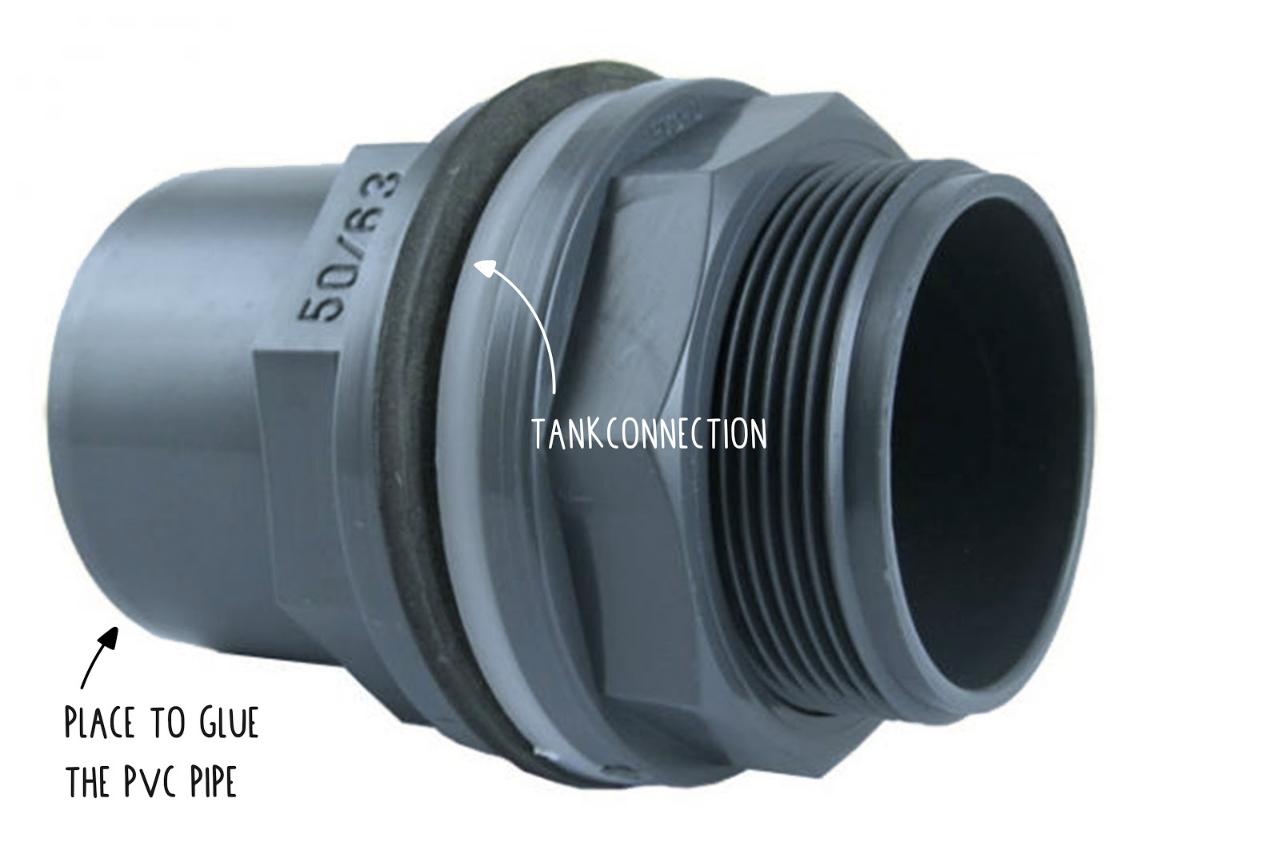
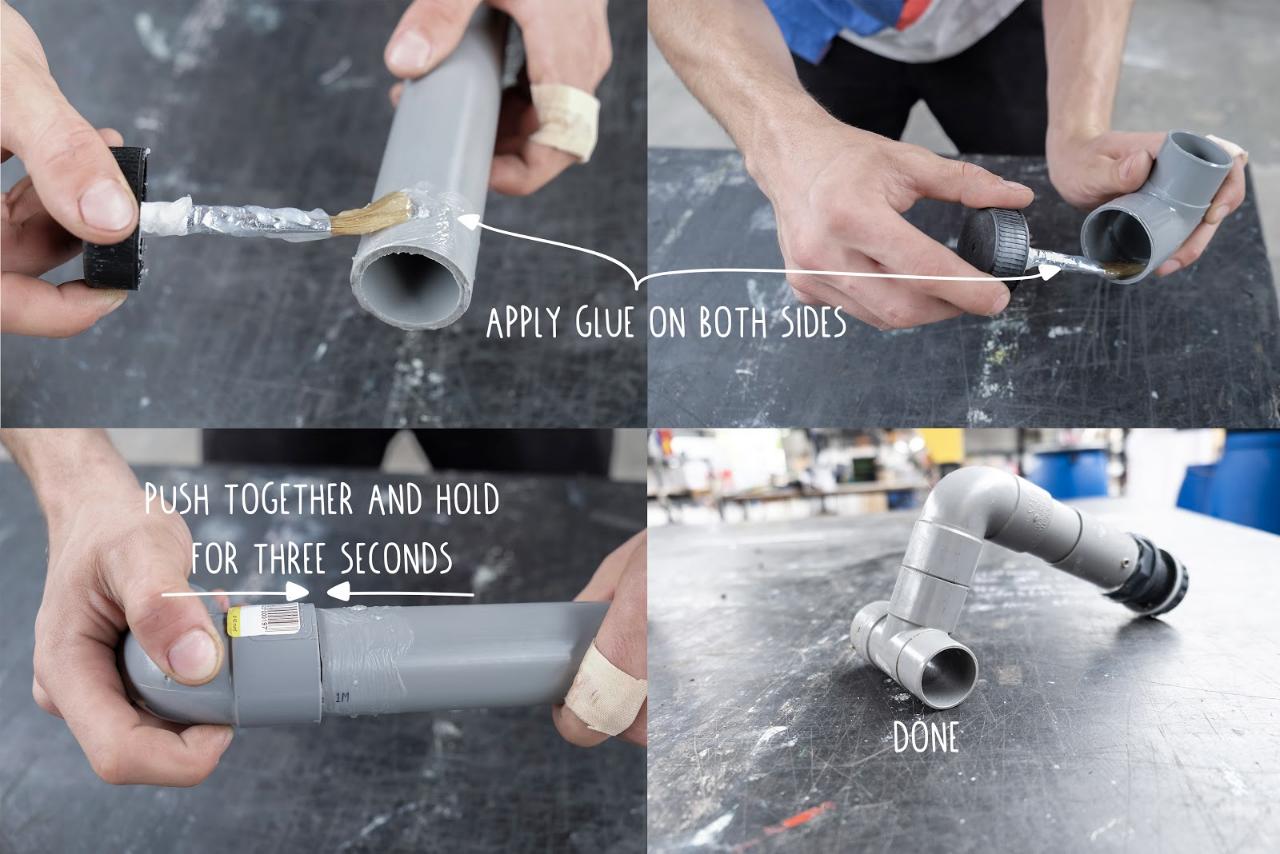
The heart of the filter is the pipe system inside. PVC pipes offer an available, easy to handle and robust solution for that. You can cut them with a hand saw or a metal chop saw and seal them with PVC glue. To connect them to the barrel you need to find threaded Bulkhead fittings with a PVC adapter.
As the bottom pipe lies beneath the sand, we need to avoid sand getting in there, but the water should pass easily. A fine mesh, from stainless steel or plastic, works the best.
It is important to have a big opening at the bottom pipe, so the water can be pushed through the sand more easily. Big PVC adapter pieces work very well for this purpose, as they are available with a lid, which is perfect to keep the mesh in place. If not available, there are many other ways to reach the same results. Just keep in mind to create a big area for the water to pass through and a mesh or small holes to keep the sand out of the tube.
The size of the pipes should be 40 mm, but if you can only get 30 mm it will also work. On the sketches, you see the exact measurements the pipes need to have to fit into the barrel and the holes we drilled before. You can also see what kind of fittings to get (feel free to improvise here).


Step 5 - Build the inside with PVC pipes
Drilling holes in the barrel weakens the structure. As there will be pressure of more than 1 bar on it later on, reinforcing that part is needed to avoid damage.
Cut a thick piece of HDPE roughly 200 x 120 mm and again drill two holes with the 45 mm Forstner drill bit, with the same distance as in the barrel.
As the HDPE sheet is flat and the barrel is round it needs to be brought in to the same shape. Heat up the sheet with a hot air gun (wear a mask!) or in the oven until it is soft enough to be reshaped easily.
Put on work gloves and use the bulkhead fittings to tighten the soft sheet inside the barrel. This way it will copy the exact form.
Once cooled down remove the bulkhead fittings, apply silicone or HDPE glue to the sheet and tighten again with the fittings. Now let the glue cure and the reinforcement is done.

Step 6 - Fix the inside parts
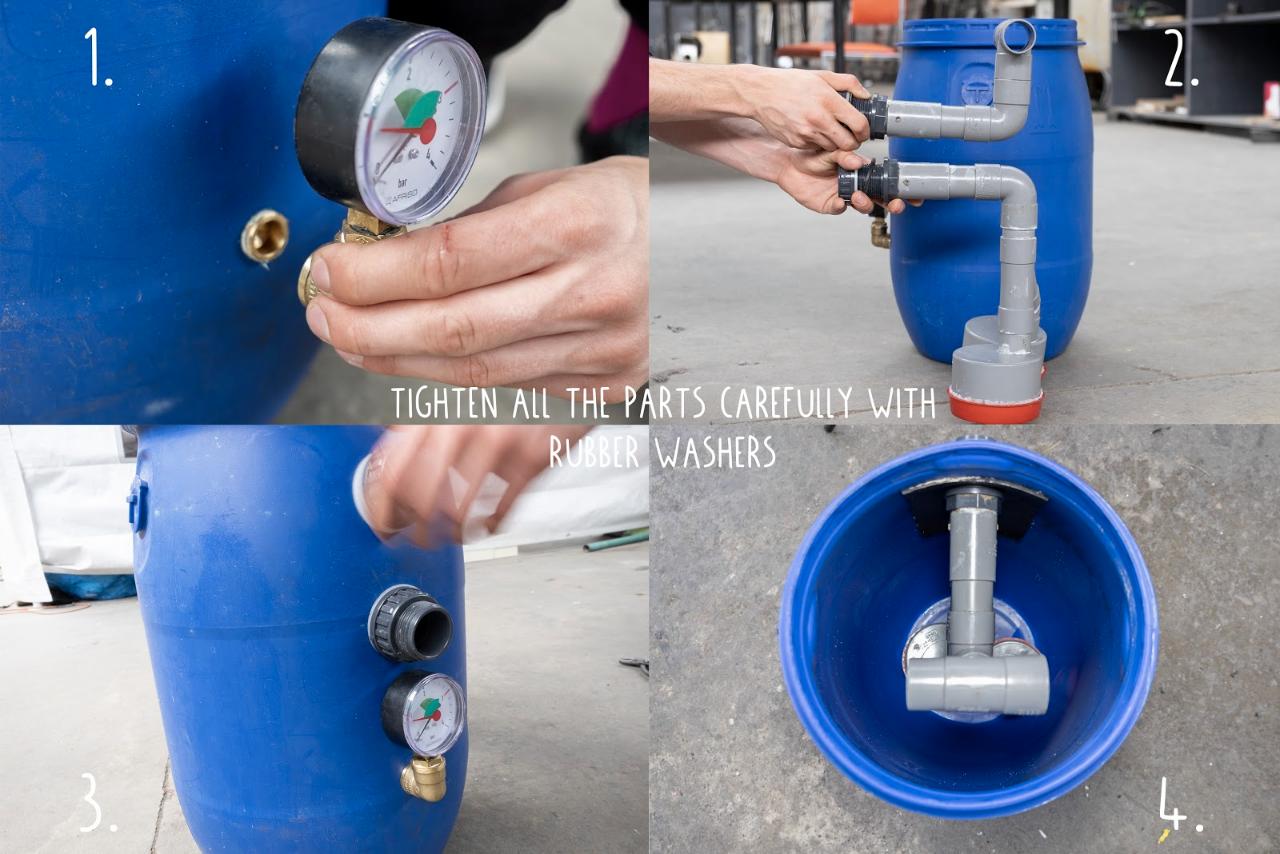
Start with installing the manometer, either find one with a coupling on the back or use the right fittings so that it faces to the front. After that, you install the PVC pipes with the right washers and tighten everything carefully with an alligator wrench. Make sure not to break the plastic threads.
Step 7 - Seal the lid
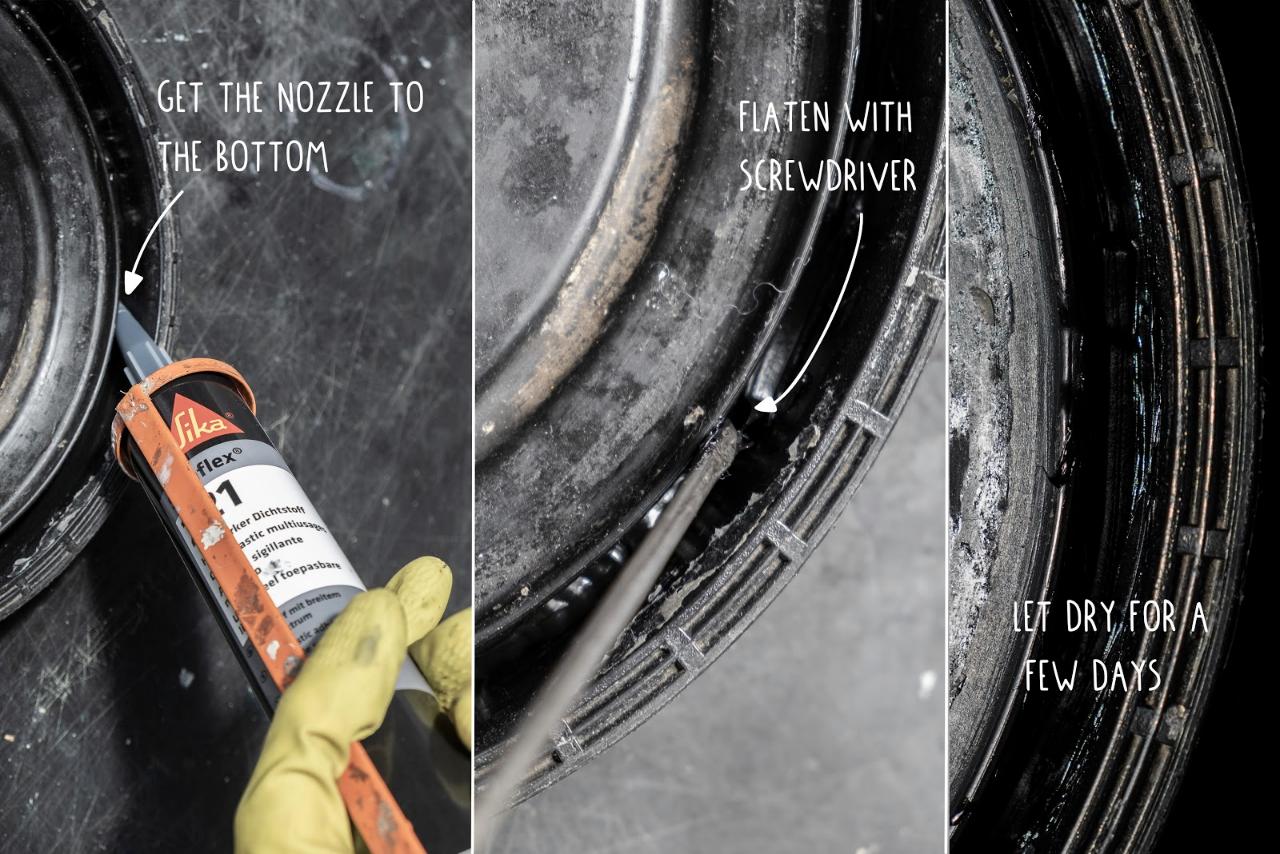
The lid of the barrel usually comes with a rubber sealant, but in our experiences it was not good enough and broke easily. Proper sealing can be achieved by filling up the gap where the rubber was sitting with silicone or another flexible sealant of good quality.
In this case, Sikaflex is used. Apply it roughly 5mm thick and flatten with the head of a screwdriver or similar object. Make sure to let it dry for the appropriate amount of time (mentioned in the data sheet of the sealant).
In this case, Sikaflex is used. Apply it roughly 5mm thick and flatten with the head of a screwdriver or similar object. Make sure to let it dry for the appropriate amount of time (mentioned in the data sheet of the sealant).
Step 8 - Building the lid reinforcement
The barrel is going to sit inside a metal frame to enable it to hold pressure. The lid is not constructed to keep pressure from the inside, so it needs reinforcement from the top.
A flat surface will ensure the pressure to be distributed equally. To achieve this, cut out two circles of wood or plastic.
Small circle: ø 240mm, 9mm high
Big circle: ø 260 mm, 18mm high
When they are cut in size lay them in the lid and proceed with building the frame.
A flat surface will ensure the pressure to be distributed equally. To achieve this, cut out two circles of wood or plastic.
Small circle: ø 240mm, 9mm high
Big circle: ø 260 mm, 18mm high
When they are cut in size lay them in the lid and proceed with building the frame.

Step 9 - Build the Frame
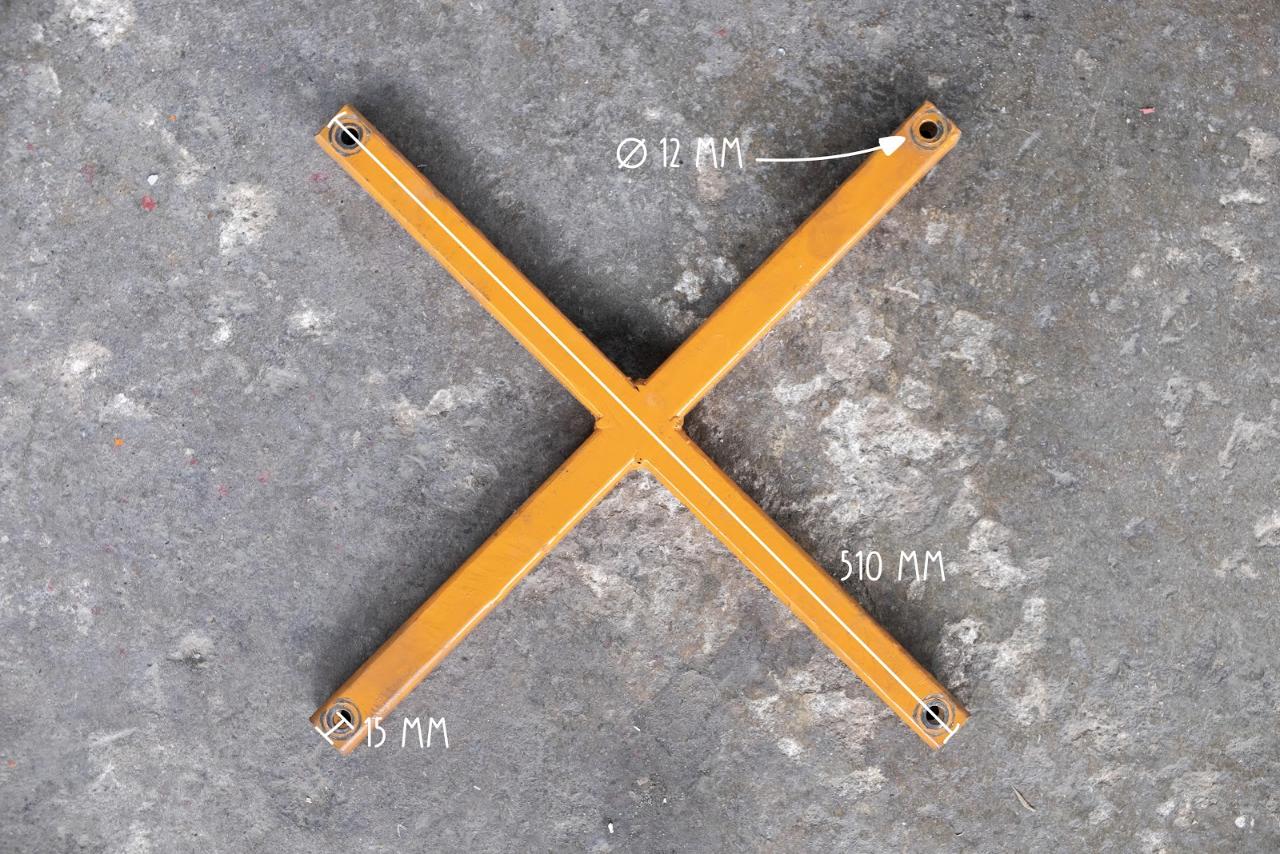
The frame provides a solid structure to bring the filter and the pump together and add some casters to make it mobile. To build the frame, cut your steel tubes to the required measurements and weld them together as shown in the picture.
In addition to this, we use a metal cross to bolt the lid down. Carefully align the holes with the nuts, so the bolts will fit smoothly. One way to do this is to first build the cross, put the bolts in the holes, screw the nuts on the bolts, put the cross in place and weld the nuts to the frame.
When all is done, paint the frame frame thoroughly, to prevent it from rusting (as it will be wet frequently).

Step 10 - Put everything together and fill up with sand
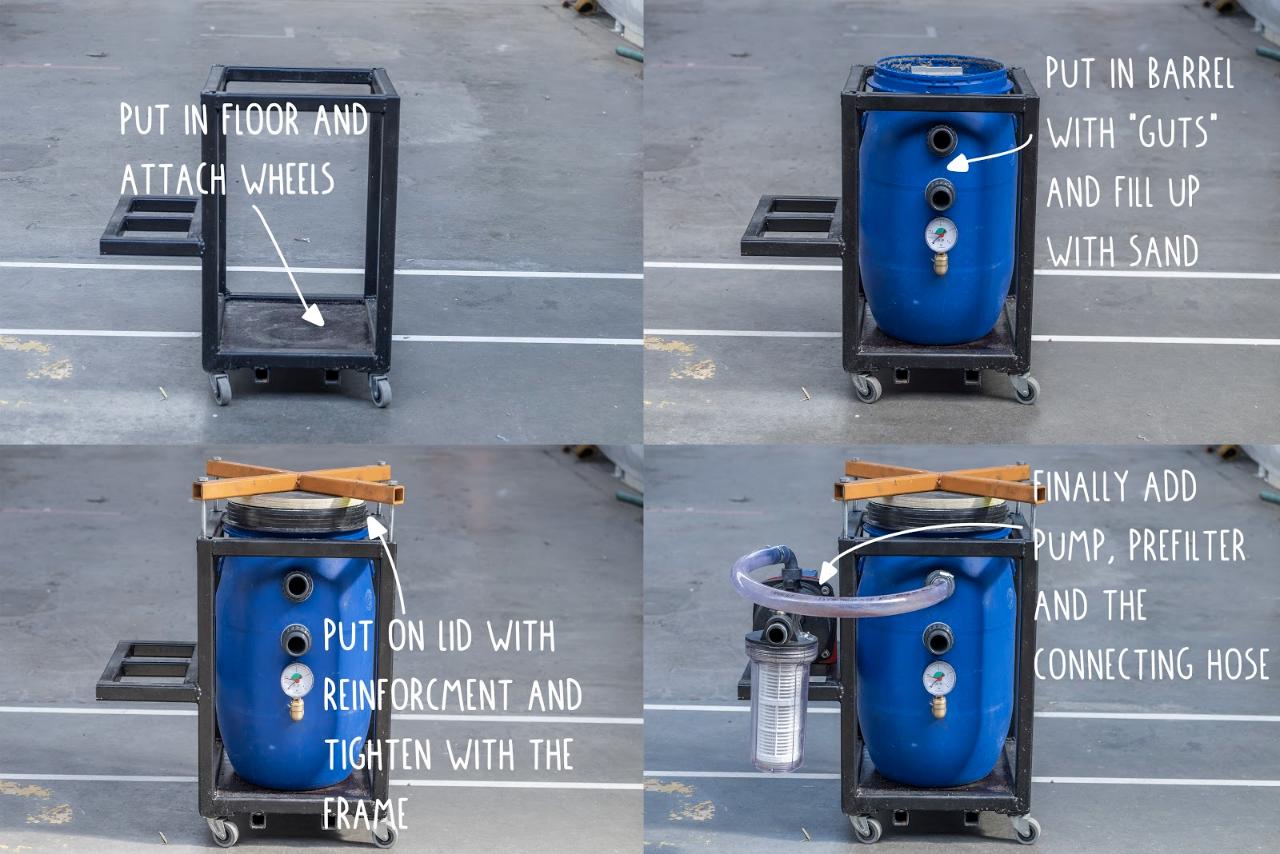
Finally, all the pieces are ready and we can assemble the filter.
First of all, cut a wooden board for the barrel to stand on, and put it in the frame.
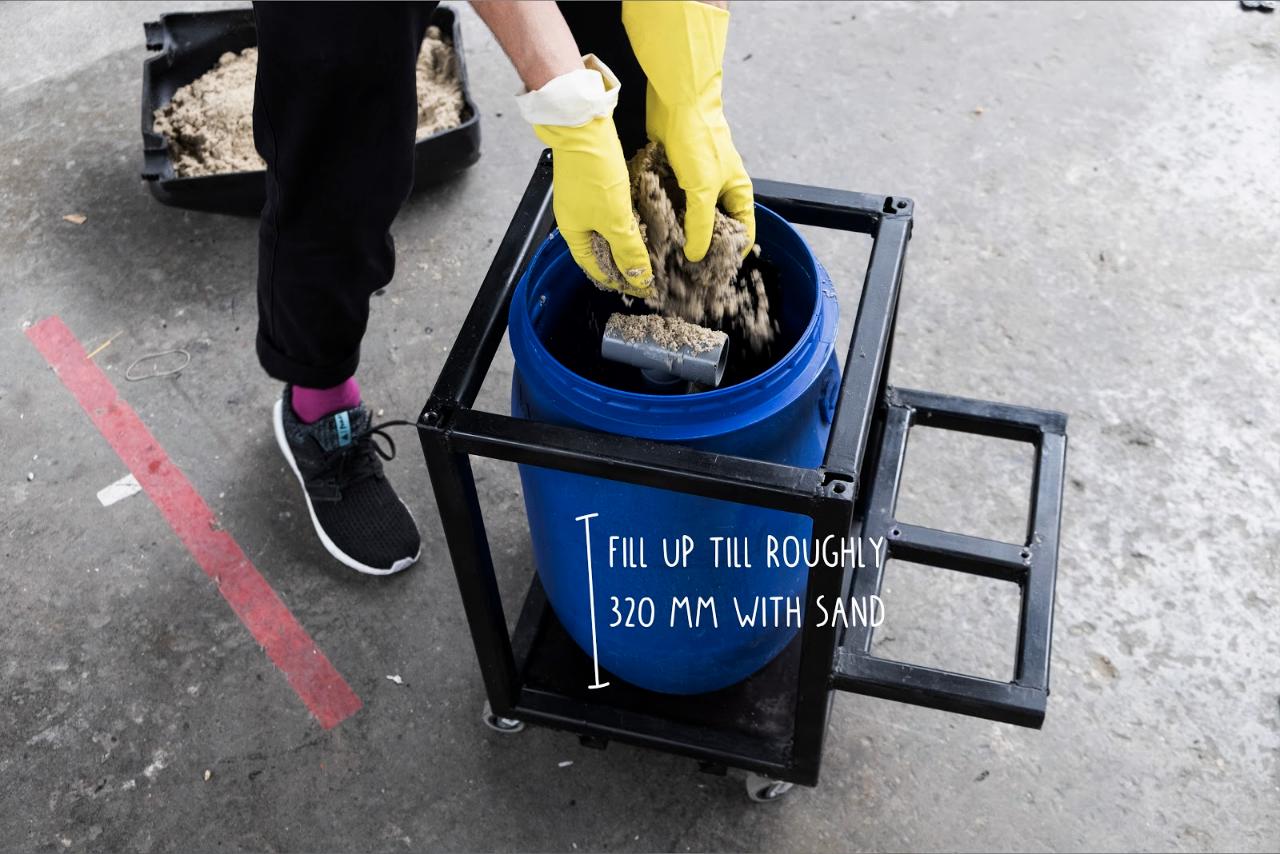
Put in the barrel, fill up with sand until around 320 mm height, or barely covering the lower PVC pipe (here you should experiment to reach the desired pressure of around one bar).
Add the lid and tighten the bolts (later on you might need to fasten them a little more, if it is not sealed enough).
Now it’s time to install the pump with two bolts, attach the pre-filter and the 1m long connecting hose. At this step, the filter is done and can be connected to the water system.
First of all, cut a wooden board for the barrel to stand on, and put it in the frame.
Put in the barrel, fill up with sand until around 320 mm height, or barely covering the lower PVC pipe (here you should experiment to reach the desired pressure of around one bar).
Add the lid and tighten the bolts (later on you might need to fasten them a little more, if it is not sealed enough).
Now it’s time to install the pump with two bolts, attach the pre-filter and the 1m long connecting hose. At this step, the filter is done and can be connected to the water system.
Step 11 - How to understand the manometer
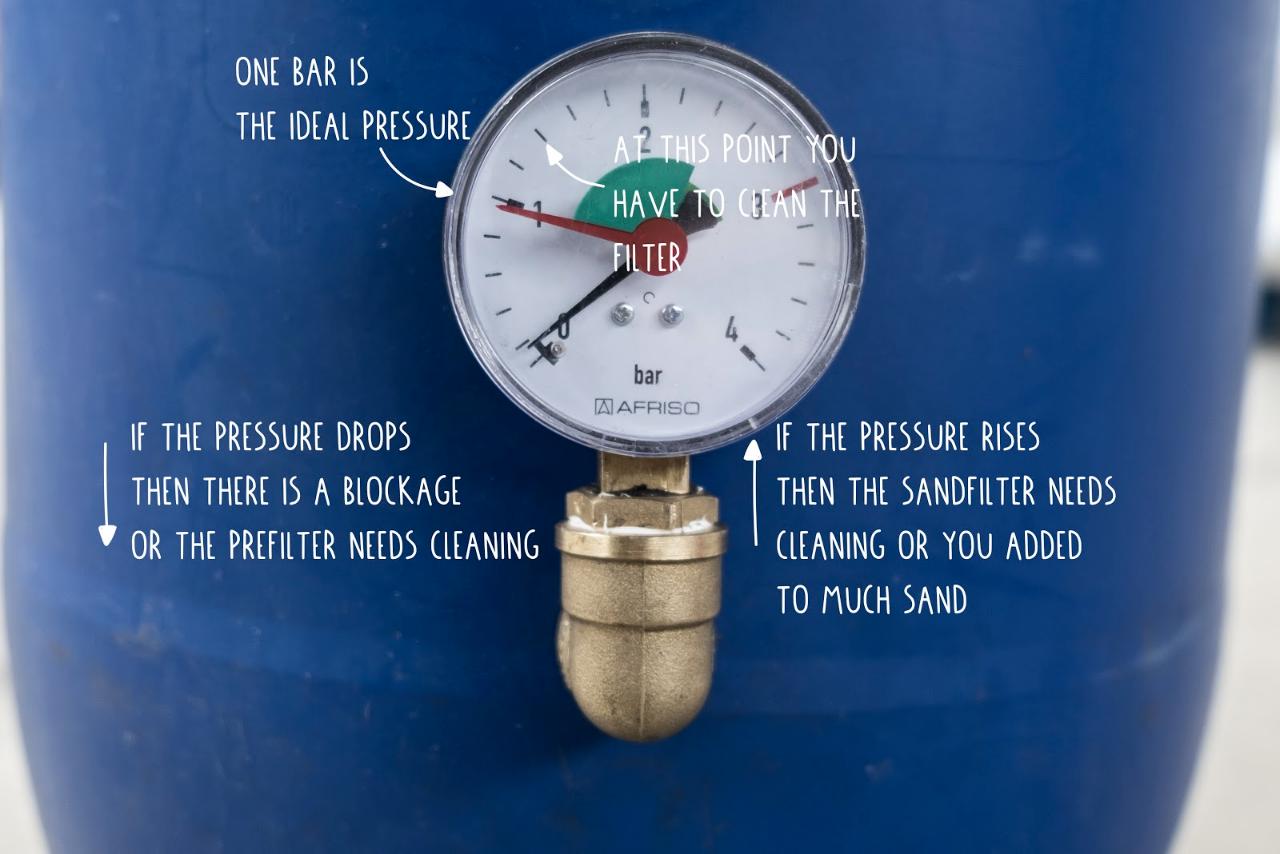
The manometer is the only instrument we have to understand the filter. Rising and dropping pressure tells a lot about the condition of the system.
Two things can happen:
1 - The pump has problems to suck the water, then the pressure in the filter sinks. This can either mean that the pre-filter needs cleaning or that there is a blockage in the pipes before.
2 - The pressure rises. That means there is a bigger resistance behind the pump. If it only increases a little, it means the filter clogs up and at a certain point it needs to be backwashed. If the pressure suddenly rises a lot, it probably means that there is no exit for the water. If this happens, turn off the pump right away, as it can build up pressure to 3.6 bar which can damage the filter.
To determine the correct pressure, run it with absolute clean sand and mark the value on the manometer. The best time to do this is when the filter is set up for the first time.
Step 12 - How to clean the filter: Backwashing
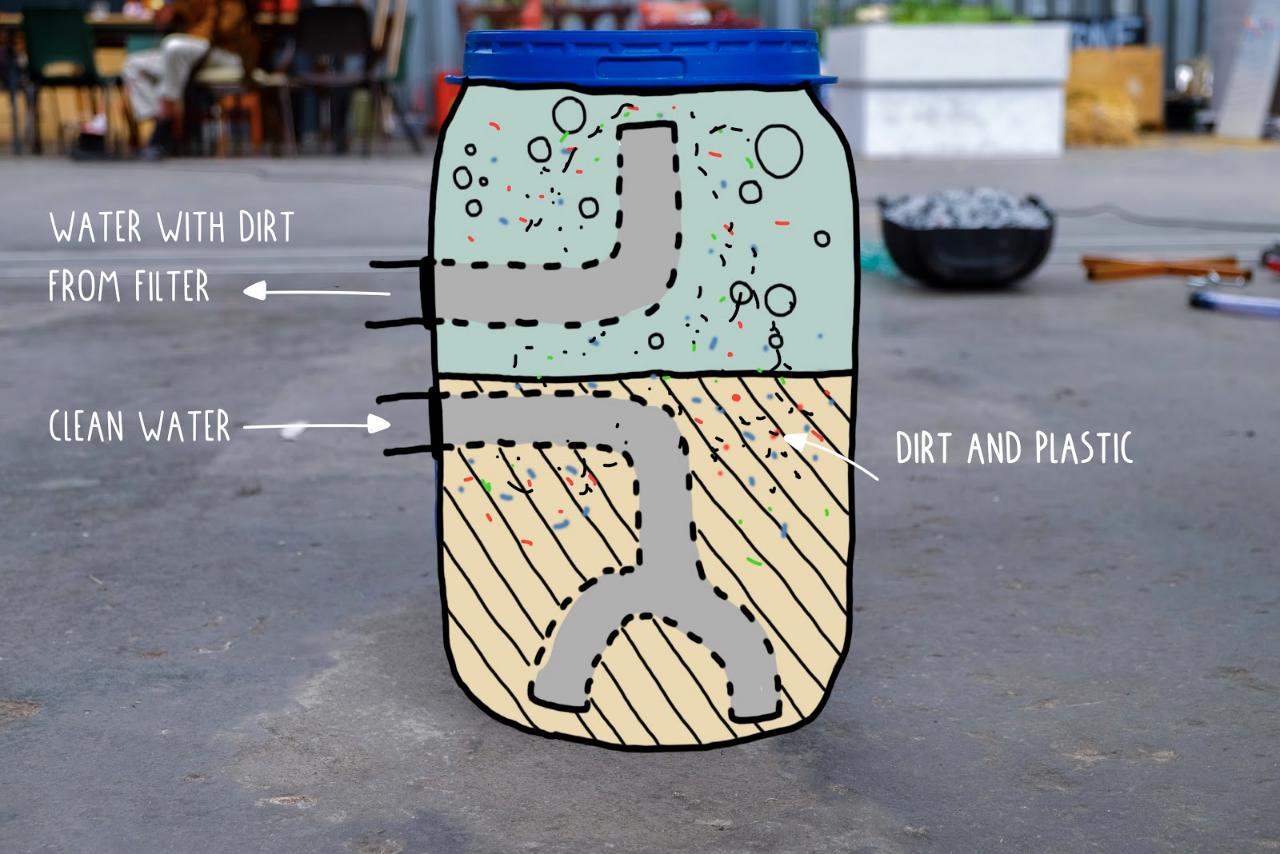
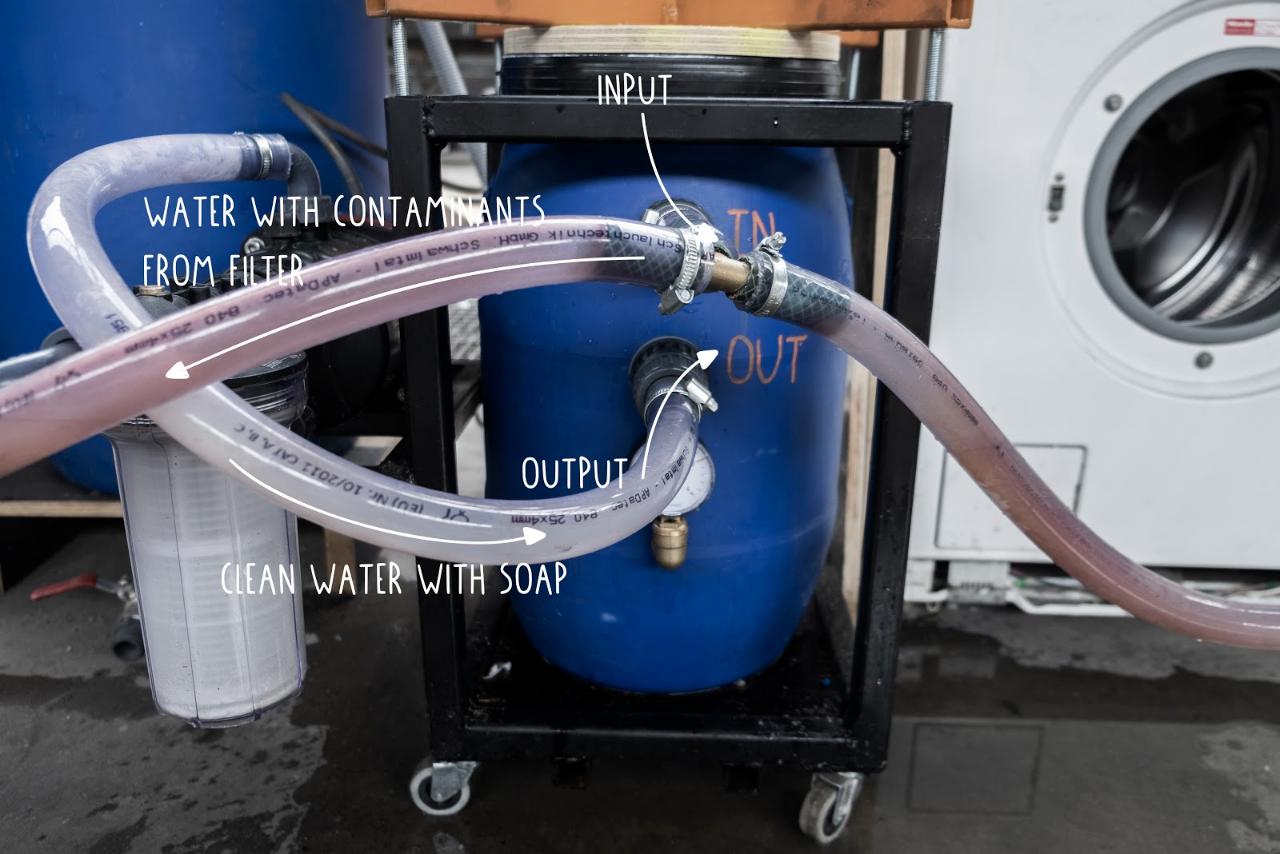
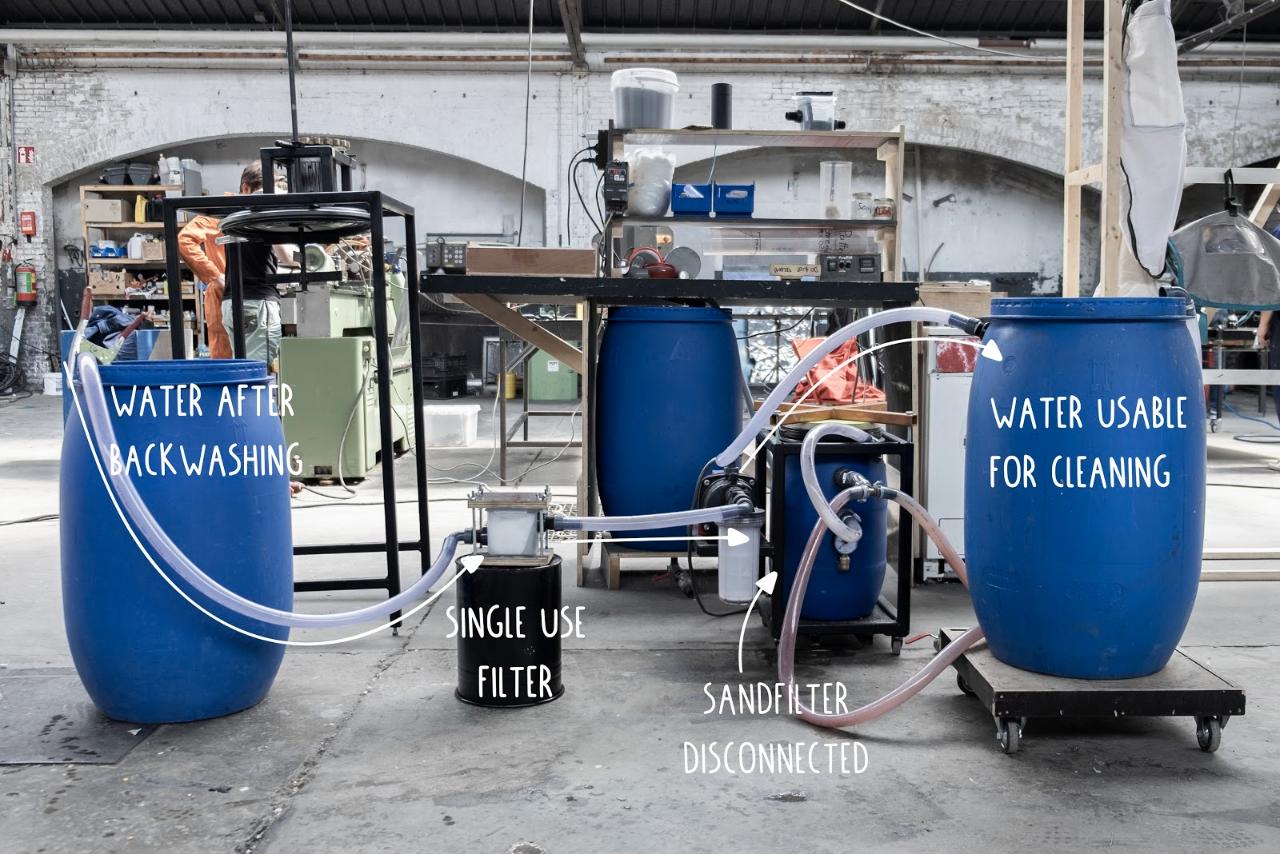
Once the sand clogged up too much and the manometer shows a high pressure, it is time to clean it. For this, the sand filter uses a process called backwashing. Clean water is pumped through the output of the filter and finds its way out through the input. While doing this, it’s forced to pass the sand from the opposite way, the sand and dirt float up, but only the dirt is light enough to go out with the water.
Roughly one 120 litre barrel of water passes this way. The water is collected and can get cleaned with a single-use filter to have it further in the system.
Roughly one 120 litre barrel of water passes this way. The water is collected and can get cleaned with a single-use filter to have it further in the system.
Step 13 - Single-use filter
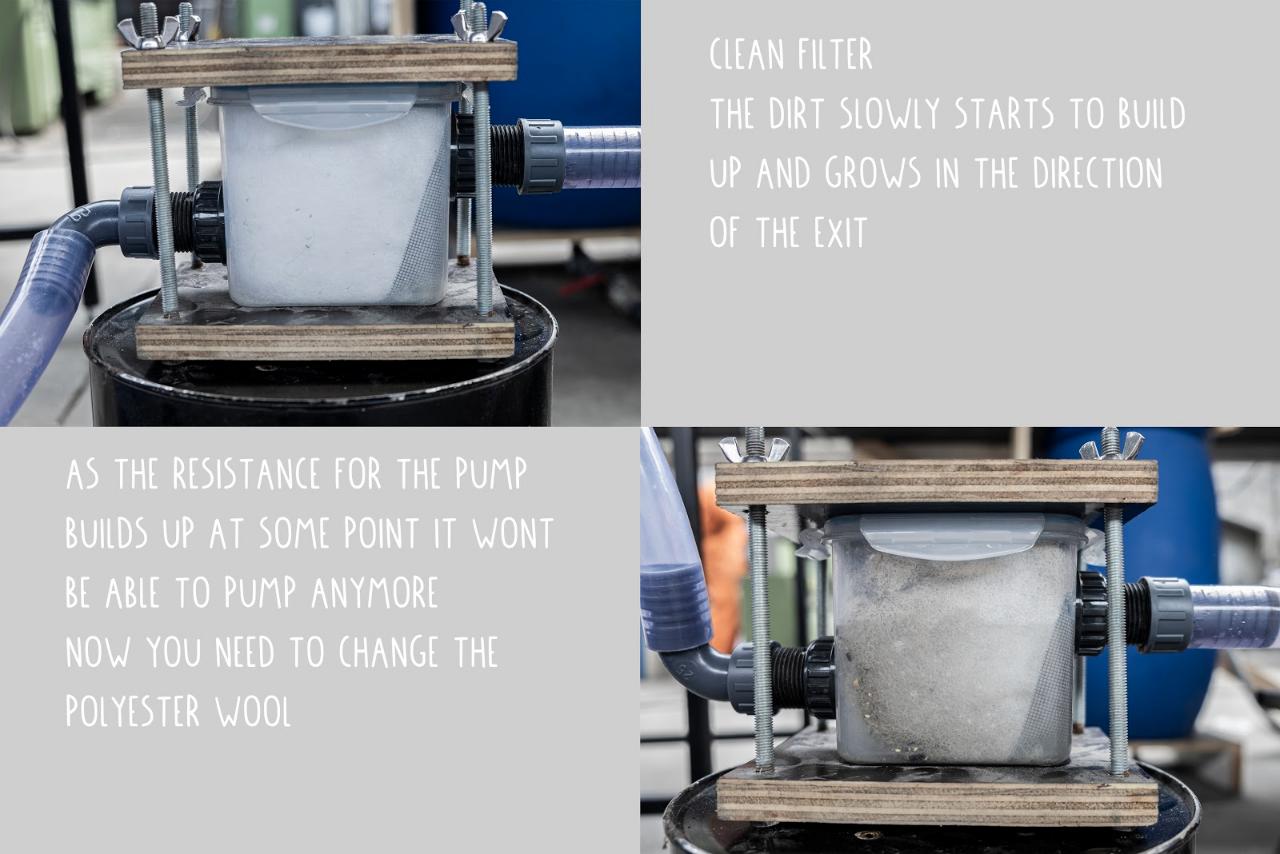
A very basic way of filtering is polyester wool. Very accessible and cheap, but plastic and usable only once. So use it with care.
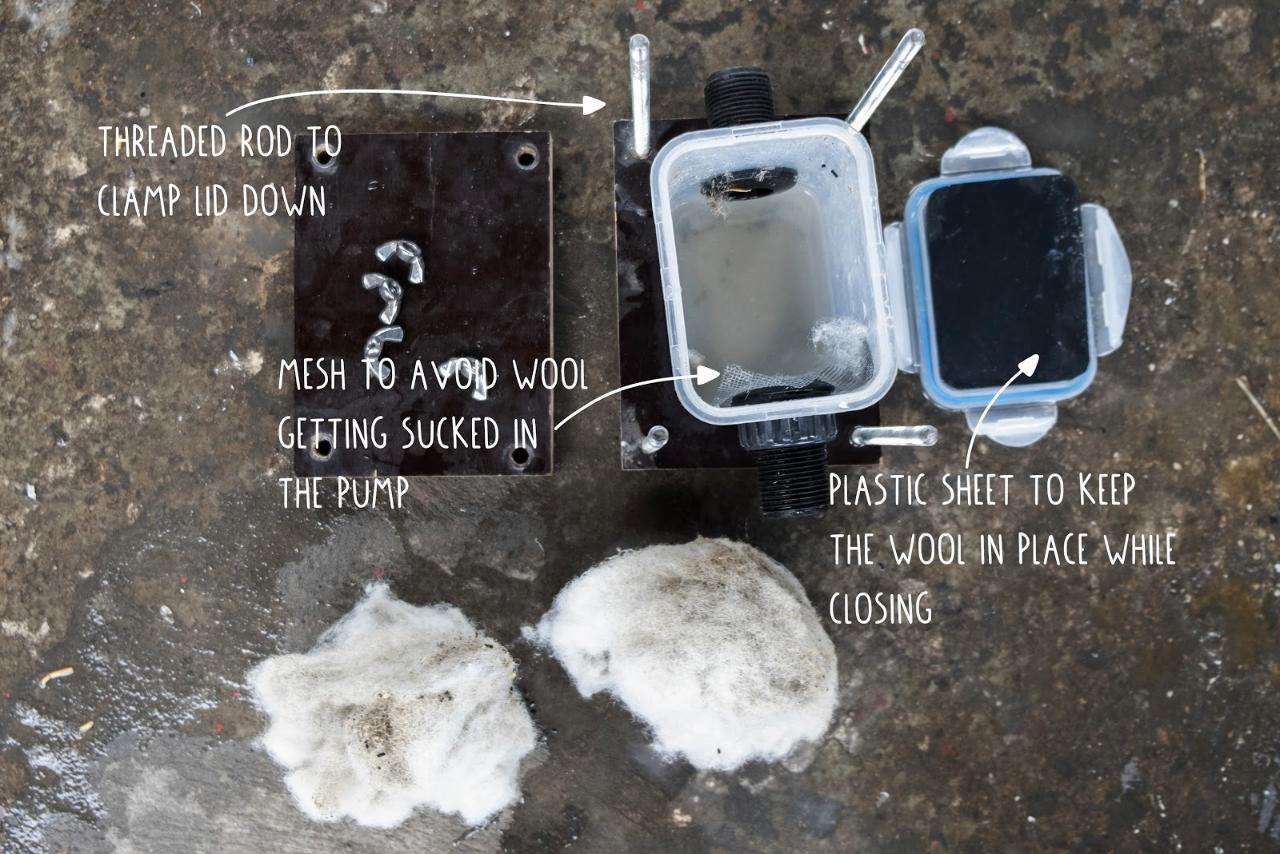
To build it, we need a casing for the wool, like a sealable plastic box. Drill holes for the fittings and build a simple clamp system to keep it properly closed.
It works best if put in line before the pump, so a vacuum is created inside the box and the lid does not open. Fill it up with wool, with light pressure, but not too much as the pump won’t manage to suck the water through it otherwise. The wool should have enough capacity to empty one dirty barrel, this is depending on the amount of dirt and size of box.
Step 14 - Cleaning the pre-filter
Cleaning the pre-filter is simple, but needs to be done quite frequently.
First, pump the water out. For this, you turn it upside down, turn on the pump and then unscrew it. The filter capsule then can be taken out, without dirty plastic water all over the place.
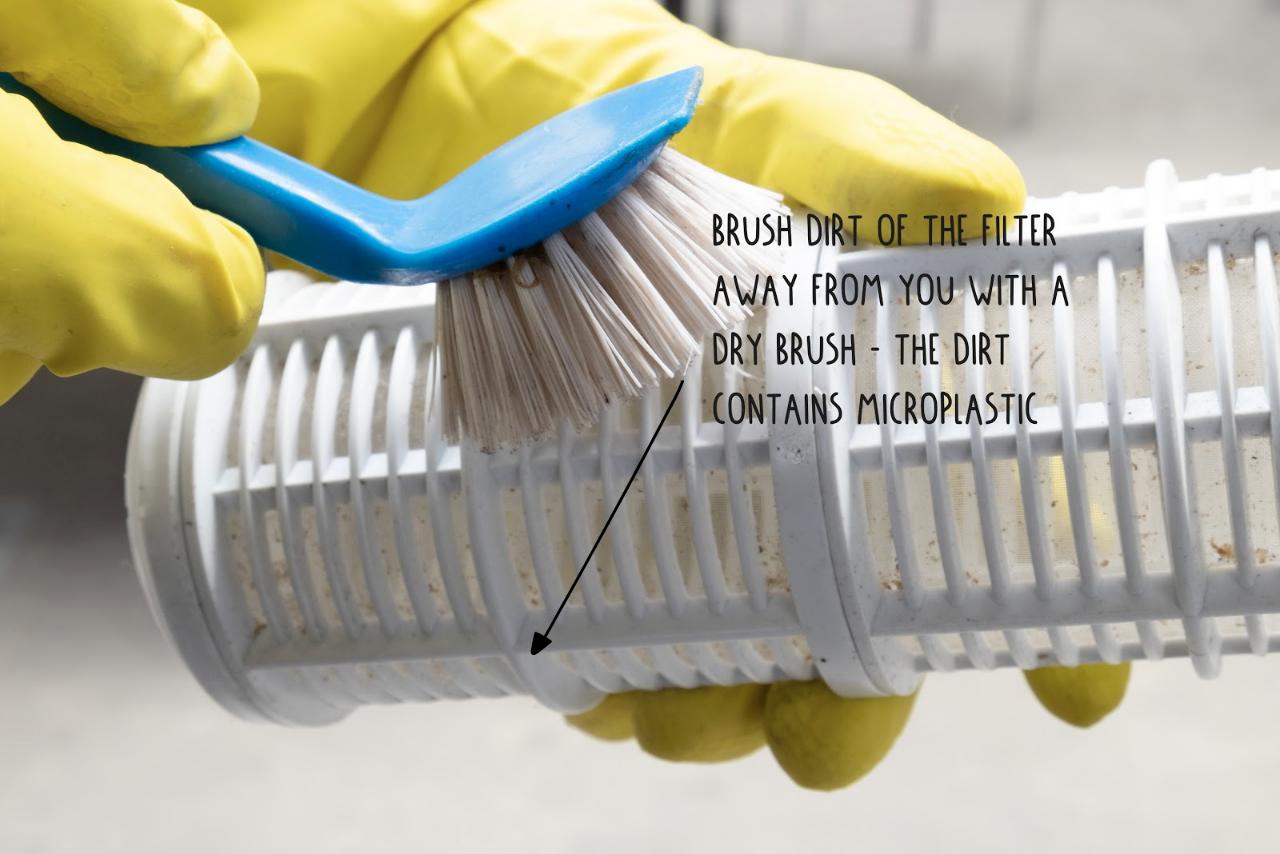
Take a dry dishwashing brush and brush the dirt off the membrane into a container, as it contains lots of micro plastic and you want to avoid it getting into the drainage.
First, pump the water out. For this, you turn it upside down, turn on the pump and then unscrew it. The filter capsule then can be taken out, without dirty plastic water all over the place.
Take a dry dishwashing brush and brush the dirt off the membrane into a container, as it contains lots of micro plastic and you want to avoid it getting into the drainage.
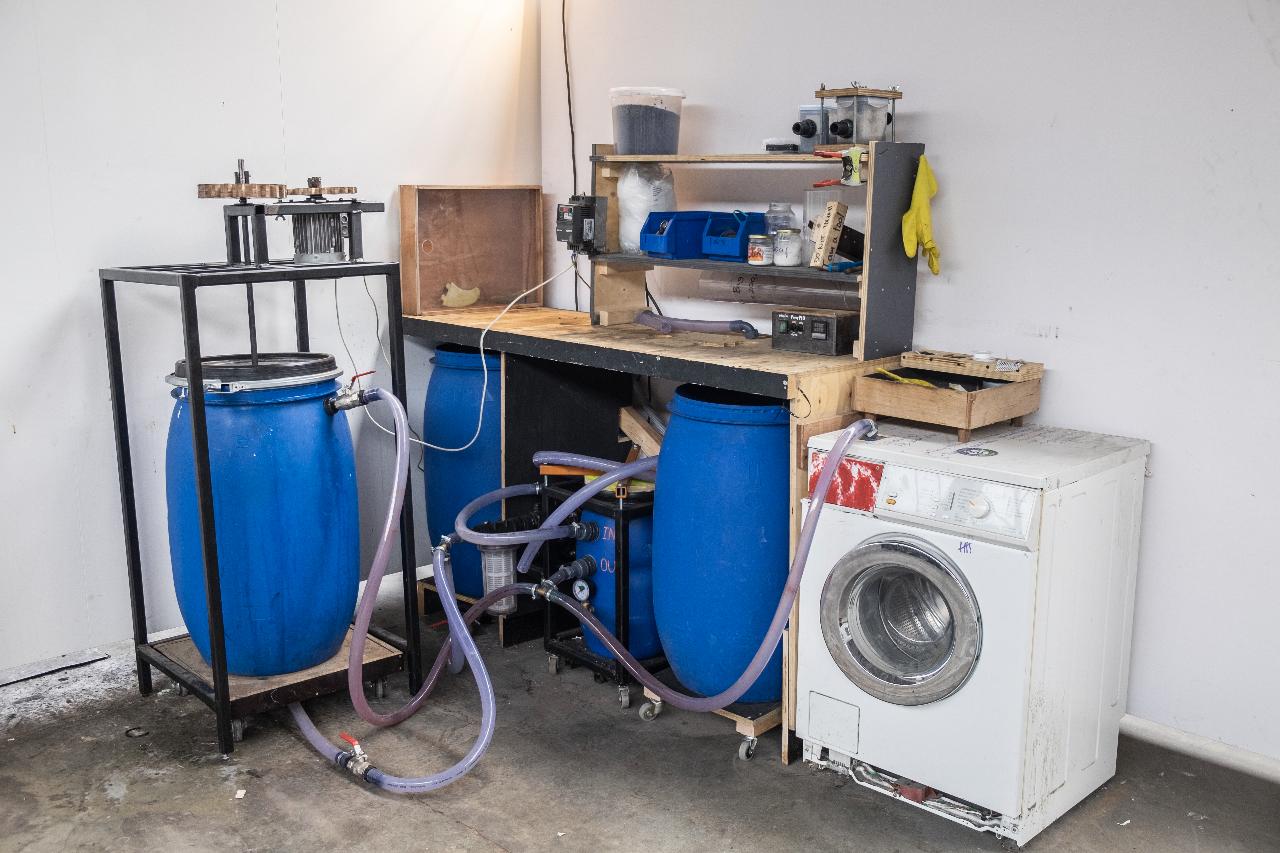
Step 15 - Complete setup
Nice one, you're ready to pre-wash :)
To build the complete setup with sand filter and washing machine, have a look at our How-To's here:
Wash plastic: Pre-wash
👉 https://community.preciousplastic.com/how-to/wash-plastic-pre-wash
Wash plastic: Washing machine
👉 https://community.preciousplastic.com/how-to/wash-plastic-washing-machine
To build the complete setup with sand filter and washing machine, have a look at our How-To's here:
Wash plastic: Pre-wash
👉 https://community.preciousplastic.com/how-to/wash-plastic-pre-wash
Wash plastic: Washing machine
👉 https://community.preciousplastic.com/how-to/wash-plastic-washing-machine
—
—
—
Comments